Treasure
- Expect Spelling errors, so the islands also give coordinates and names straight from game map.
- The maps now are credited to who made them or who posted the post that I pulled them from. If you know one of them to be false or one that doesn't have a credit PLEASE feel free to message me and let me know who made the map. If there was a map edit you will likely notice a thicker and darker line or writing added to the map and it will read that a small edit was made by me. This happens typically when there was either confusion or an extra box was in the map. I try to keep them accurate for those who prefer to use the map only. And all my paths are done for the fewest amount of steps I could take. So that is also why I might have noticed a specific error on the map.
- Items you will NEED to start your journey are Gold Dubloon (single or roll), Scuba Gear (50% encumbrance), and a Shovel (5% encumbrance).
- Items you might WANT to to have for your journey are zombie hunting gear if you plan to go to an island with a crypt such as Los Muertos, a netherworld cutlass (can also be found on Isla Maldita) to help deter the mass hoards of pirate skeletons, and items to boost your health (needed if you plan to do more than just a couple islands near each other) as your health will drop varying degrees on each island. Also if you see a mermaid then you will get a health boost so that is great too.
- I also included the encumbrance of any reward items that I knew so that you could plan your trip as your inventory can fill up quickly while collecting treasure. It should be noted some Islands won't have the encumbrance on the rewards.
Create your own adventure
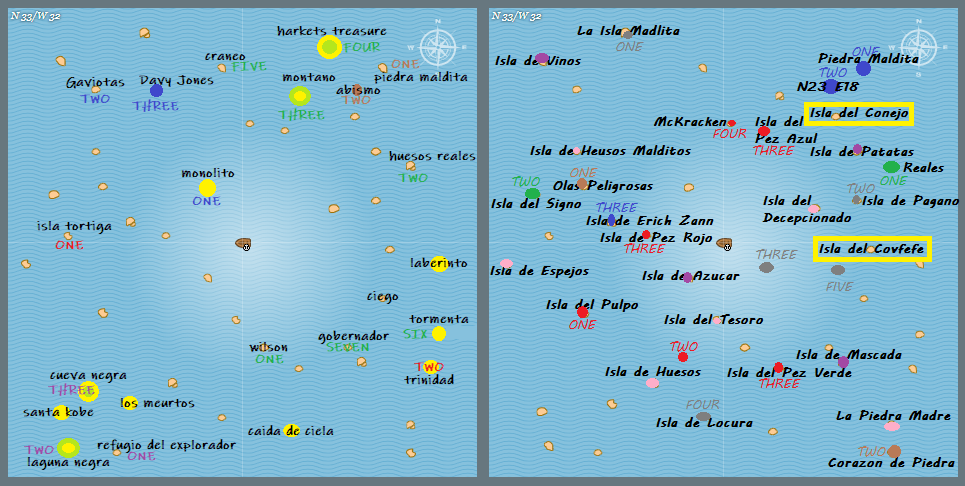
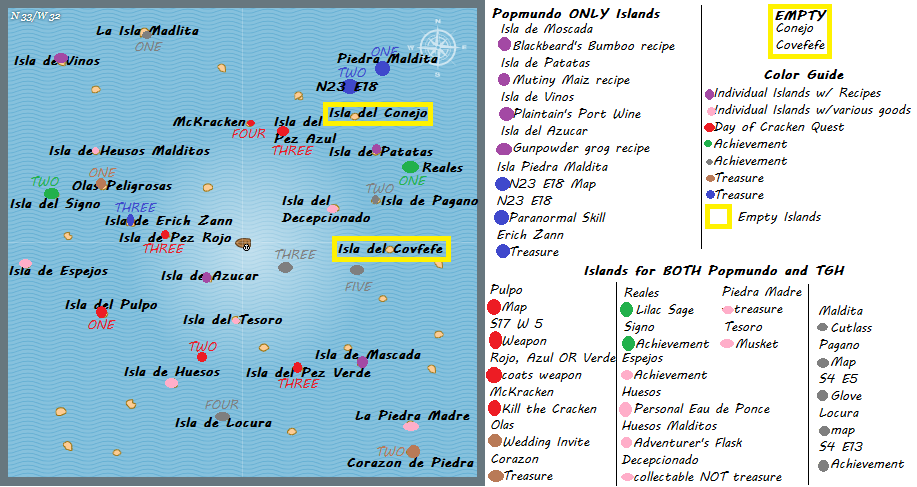
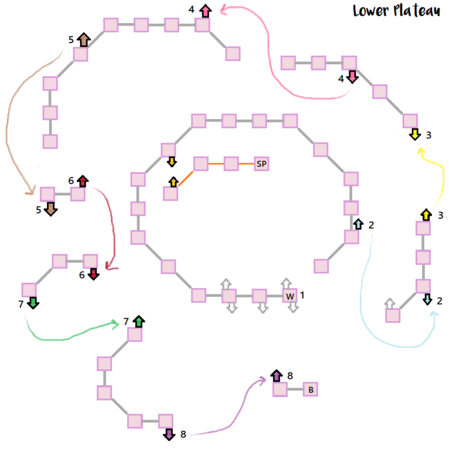
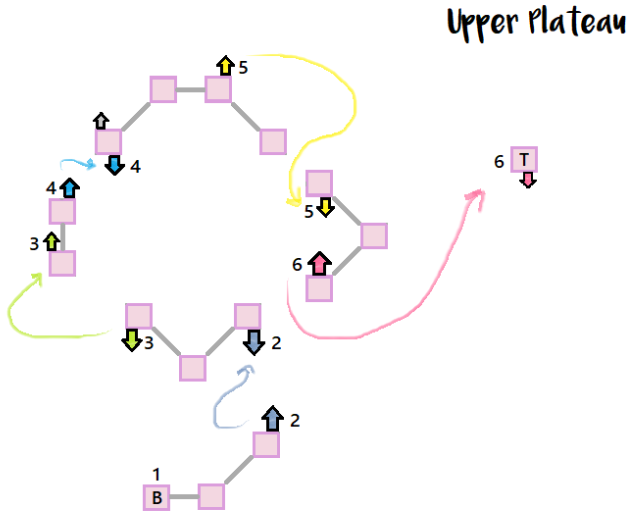
So the maps in this section are the various maps that can be used to decide what islands are worth touring for you. Obviously my adventures might not fit in with what you want. I tried to place the maps in an order going from lower left quadrant and counter clockwise while still accounting for having to go back. So I put together the two maps I created so you can see what maps I used to decide and then I also included the ones that I got off the forum. Feel free to click on the maps to also see a larger version of them. The numbers in the top map identify if there is a specific order to do the islands in. So I found starting in the lower SW Quadrant then going counter clockwise to the NW Quadrant the easiest way to start before I traveled clockwise to finish off my Islands. Now once you have a list you are free to go ahead and look for the map on the page that associates with that Island. Happy Travels Everyone.
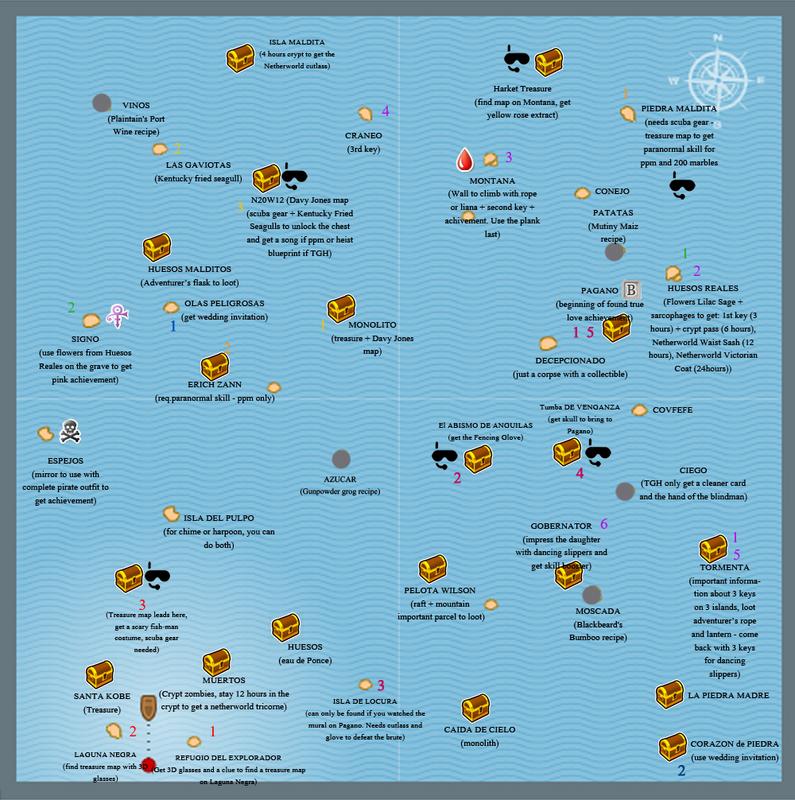
Credit: Unknown
|

Credit: Unknown
|
Credit: Tobias Deiana (ID:2386790)
Credit: Tobias Deiana (ID: 2386790)
Note: Recipe Islands are now for EVERYONE
THE ISLANDS Themselves
isla de la Santa Kobe (S24 W26)
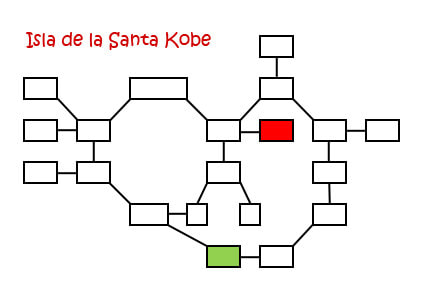
Credit: Unknown (if you know the credit feel free to message me)
|
Directions: Start At Green, Go To Red
NW - E - NE - N - E Use monolith W - S - SW - W - SE Reward:
5 XP |
Refugio del Explorador (S30 W18)
Step One: Map to Cueva Negra (S19 W22)
Skip if you already have 3D glasses and/or Map to Cueva Negra (S19 W22)
Skip if you already have 3D glasses and/or Map to Cueva Negra (S19 W22)

Credit: Alamo Littleton (ID: 3221055)
|
Directions:
N Use home theater S Reward:
3D Glasses: 1 use |
Laguna Negra (s29 W25)
Step Two: Map to Cueva Negra (S19 W22)
Skip if you already have the Map to Cueva Negra (S19 W22)
Skip if you already have the Map to Cueva Negra (S19 W22)

Credit: Frank Gowing (ID: 3343912)
|
Items NEEDED:
3D Glasses (can be acquired on Refugio del Explorador) Directions: Start at Red, Go to Blue
NW - NE - N - NE - N - NW - NE - N Go to inventory and use 3D glasses S - SW - SE - S - SW - S - SW - SE Reward:
Ocean Treasure Map S 19/W 22 (1% encumbrance) |
Ocean map: s19 W22 (Cueva Negra)
Step 3: Final Destination Cueva Negra (S19 W22)
Must possess the Ocean Map S19 W22 to go
Must possess the Ocean Map S19 W22 to go

Credit: original by Harvey Crook (ID: 3292547) and slight edit by Tobias Deiana (ID: 2386790)
|
Items NEEDED:
Scuba Gear Directions: Start At Green, Go To Dark Blue
E - NE - N - NW - N - E - N - NE - N - NW - NW - SW - SW - S - SW - SW - SE - E - N - NE Use Item SW - S - W - NW - NE - NE - N - NE - NE - SE - SE - S - SW - S - W - S - SE - S - SW - W Reward:
5 XP Scary Man-Fish Costume (5% encumbrance) |
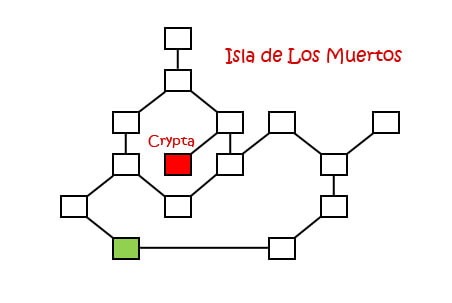
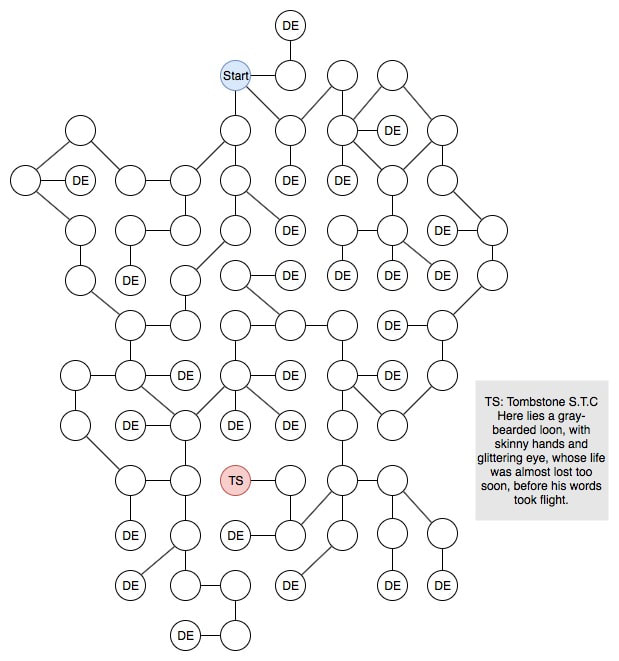
Isla de Los Muertos (S23 W16)
WARNING: There are zombies in the crypt. I would bring some zombie hunting gear.
Note: I lasted about 2 hours in the crypt before fleeing due to health drops. I made the mistake of bringing the wrong zombie hunting tool.
Note: I lasted about 2 hours in the crypt before fleeing due to health drops. I made the mistake of bringing the wrong zombie hunting tool.
Credit: Unknown (if you know the credit feel free to message me)
|
Directions:
Start At Green, Go To Red NW - NE - N - NE - SE - SW Use Crypt (see map below): Start at Green, Go To Blue N - W Use Fount after 12 hours E - S Use Gate NE - NW - SW - S - SW - SE Rewards:
5 XP (Unchecked) |

Credit: Unknown (if you know the credit feel free to message me)
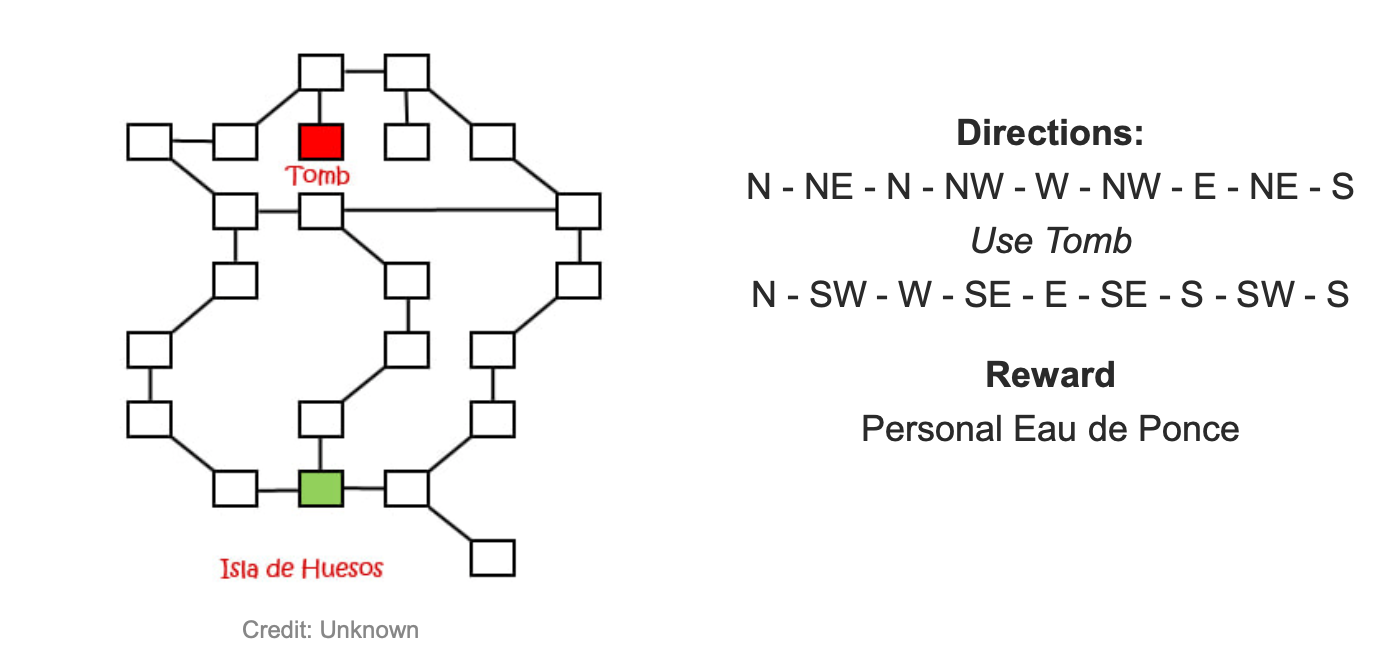
isla de heusos (s20 w10)
Isla del Tesoro (S11 W1)
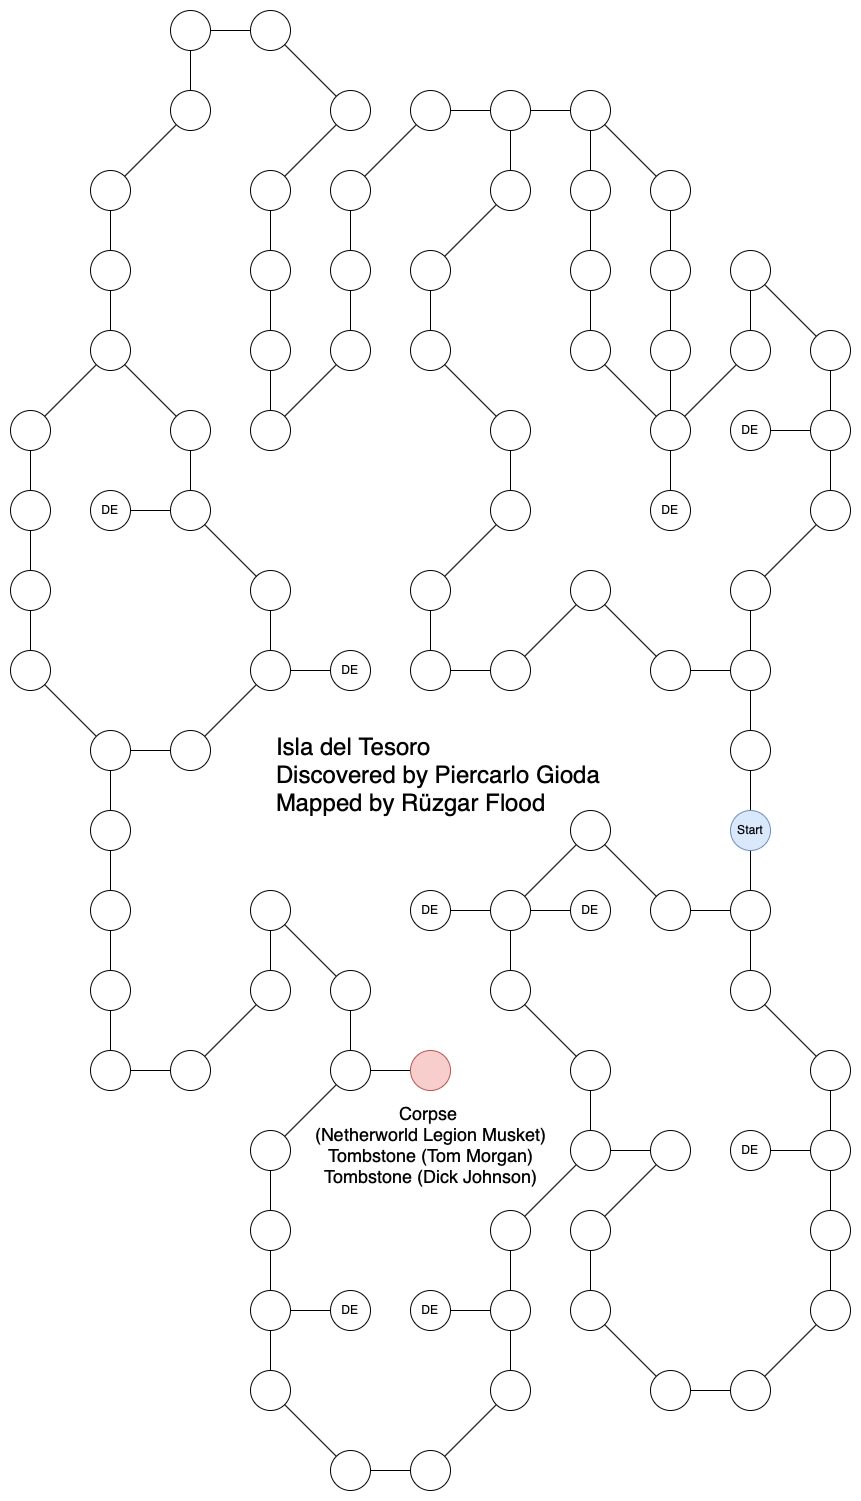
Credit: Ruzgar Flood (ID: 698090)
|
Directions: Start At Green, Go To Red
S - W - NW - SW - S - SE - S - S - SW - W - NW - N - N - N - NE - E Use corpse W - SW - S - S - S - SE - E - NE - N - N - NE - N - NW - N - NE - SE - E - N Reward:
Netherworld Legion Musket |
Isla de la Pelota Wilson (S15 E3)
WARNING: There are pirate skeletons.
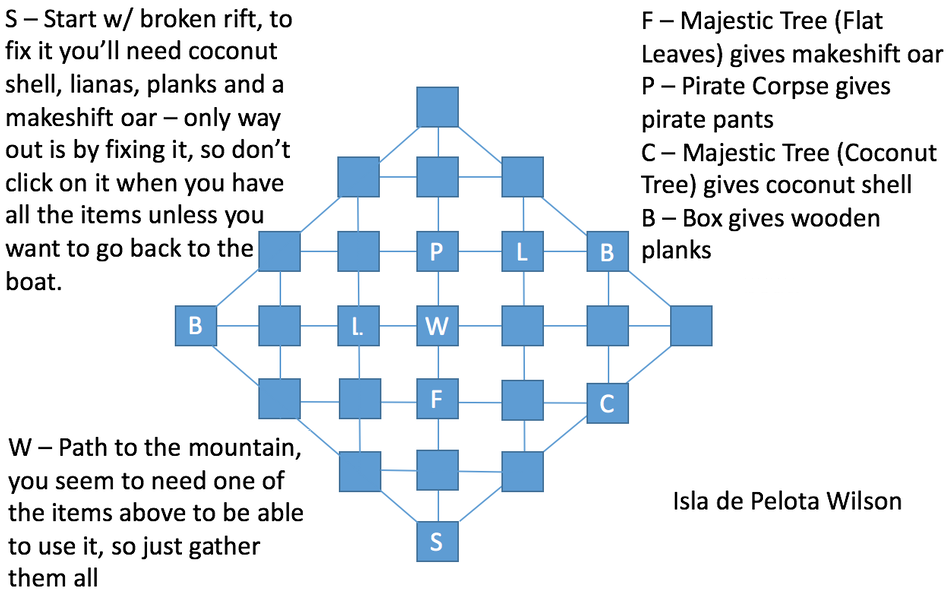
Credit: Unknown (if you know the credit feel free to message me)
|
Directions:
N - N (Use Tree) - E - E (Use Tree) - N - N (Use box) - W - (Use tree) - S - W Use Wall (will take aprox. 12 mins) E - NE - U - NW - W - SW - U - E - E - N - U Use Corpse to get Pirate Pants Use box to get Important Parcel Use Ledge (will take aprox. 17 mins) S - S - S Use broken raft |
Reward:
Pirate Pants - red leather (3% encumbrance) Important Parcel (2% encumbrance) Note: Needs to be returned to the Post Office in NY to be considered a treasure and get the 2 XP reward |
Note: You can only use a tree every two minutes.
Also upon repairing your raft you will have used ALL your items.
Also, aprox times are based on diary entries.
Also upon repairing your raft you will have used ALL your items.
Also, aprox times are based on diary entries.
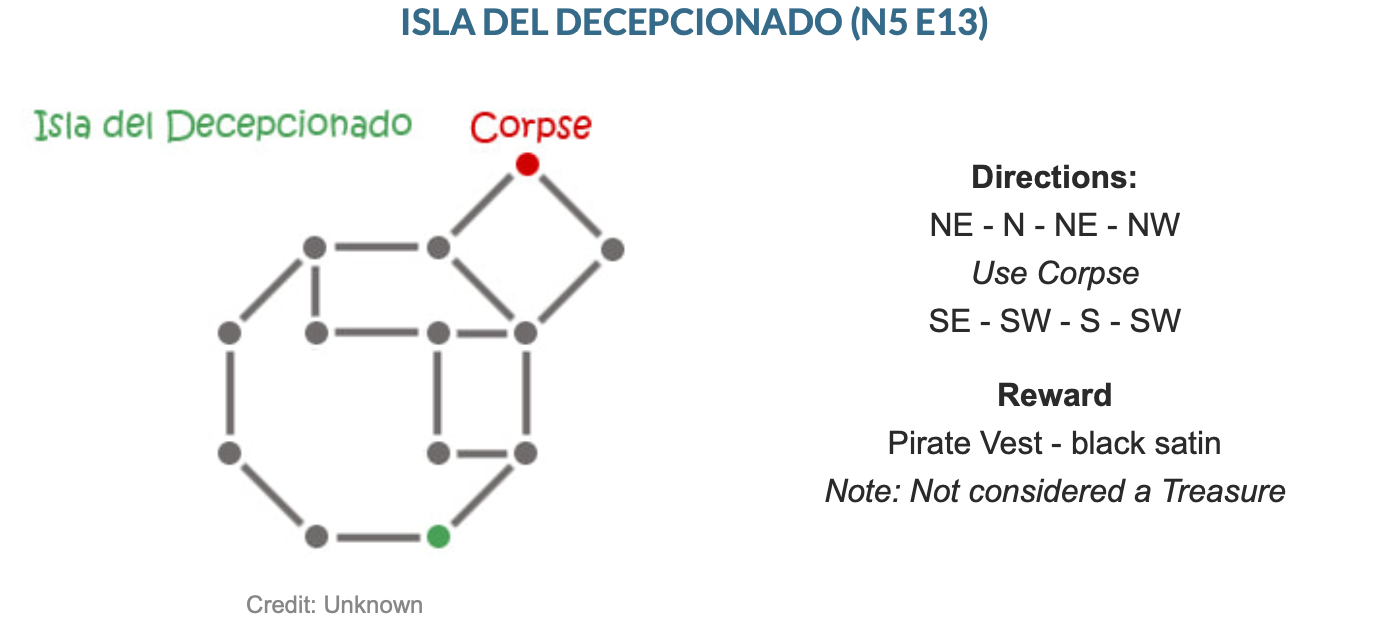
Caida de Cielo (S27 E7)
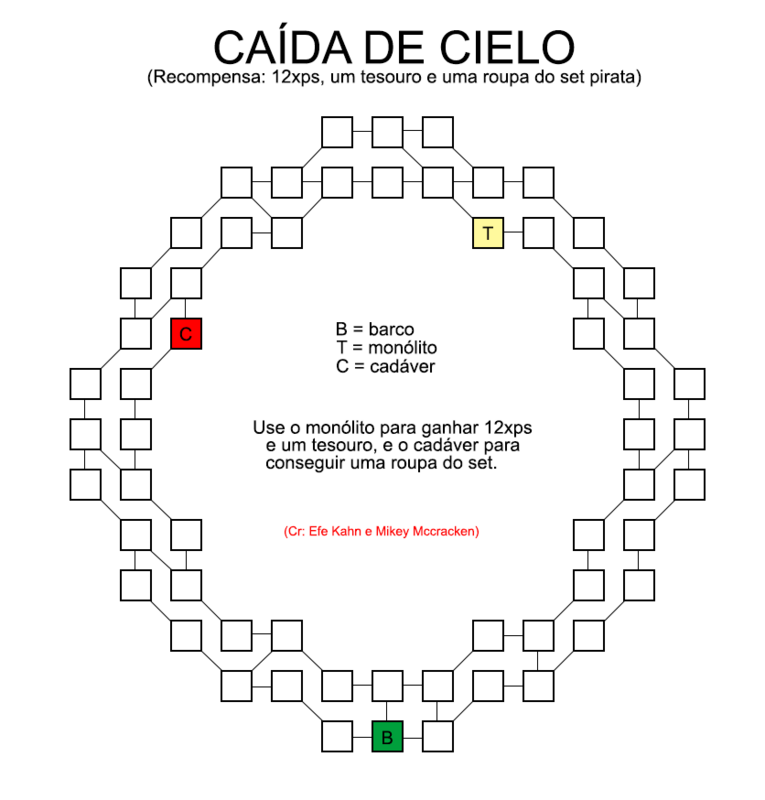
Credit: Efe Kahn (ID: ?) and Mikey McCracken (ID: 3362566)
|
Directions: Green -> Yellow -> Red
N - E - NE - E - NE - N - NE - N - N - NW - N - NW - W Use Monolith NW - W - W - SW - W - SW - S Use Corpse SW - S - S - SE - S - SE - E - SE - E - S Rewards:
12 XP Pirate Boots - purple leather (2% encumbrance) |
le piedre madre (s26 e24)

Credit: Unknown
|
Directions:
W - N Use Item S - S - S - NW - N - N - N Use Corpse E - E - E - S - SW Reward:
Pirate Sash - orange cotton (1% encumbrance) Treasure Note: Is not a physical item |
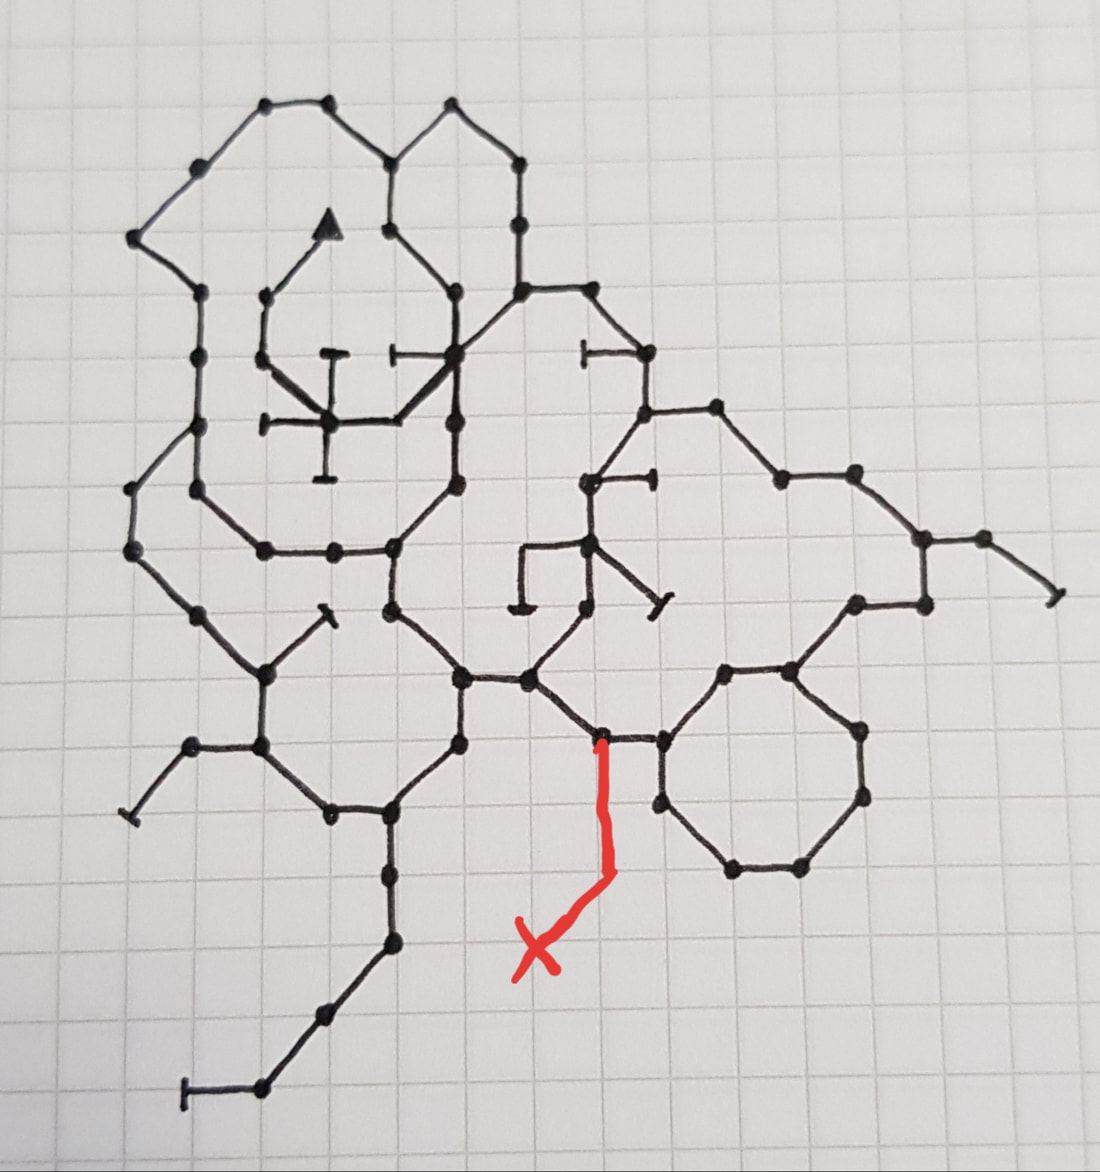
ISLA DE TORMENTA (S13 E28)
Step One: Journey to Isla del Gobernado
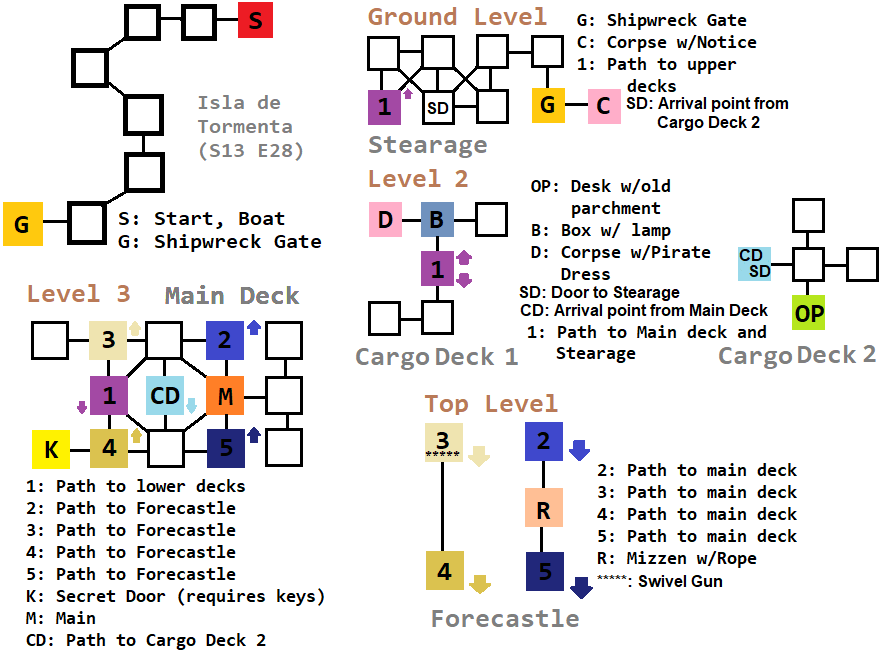
Credit: Tobias Deiana (ID 2386790) with the help of directions from Mikey McCracken (ID: 3362566) based on original map by Unknown (if you know the credit feel free to message me)
|
Directions:
W - W - SW - SE - S - SW - W Use Gate (will take aprox 7 mintues) N - W - SW - NW - S - Up - N Use box (lamp) E Use Corpse E - S - Up - N - Up Use corpse gunner (Swivel Gun) Down - E - E - U - S Use mizzen (rope) N - D - W - S Go to inventory and use swivel gun N - SE Use main NW - S Use Cargo Door E - S Use Desk (old parchment) |
Directions (cont.)
N - W Use door to steerage deck E - N - E - S Use Gate (will take aprox 9 minutes) E - NE - N - NW - NE - E - E Credit: Directions helped by Mikey McCracken (ID:3362566) as I couldn't figure out this map. Reward:
Lamp (will need for another island) (4% encumbrance) Rope (will need for another Island) (2% encumbrance) Old Parchment (will need for another island) (1% encumbrance) Pirate Pants - purple cotton (3% encumbrance) |
Isla del ciego (S8 E20)
WARNING: Maybe I am just really unlucky, but this island dropped my health quite a bit. Over 20% easily.

Credit: Gertrude Griffiths (ID: 3360327)
|
Directions: Start At S, Go To B, Go To M
NE - NE - N - NW - SW - W - NW - NE Use box SW - W - SW - S - SE - S - SW - S - SE - SE - SW - S - SE - S Use Corpse N - E - SE - E - N Use Washing Machine S - NE - N - NE - N - NW - W - NW - W - N - NE Reward:
Cleaner Caller Card: 5 uses (1% encumbrance) Blind Man's Hand: 15 uses (1% encumbrance) Pirate Pants - black satin (3% encumbrance) |
Isla del laberinto (S3 E28)
WARNING: Large health drops here. I ended up having red health when I used the statue. Which luckily brought me back to 100% mood AND health. HOWEVER, by the time I made it back to the boat, I only had 62% health left.
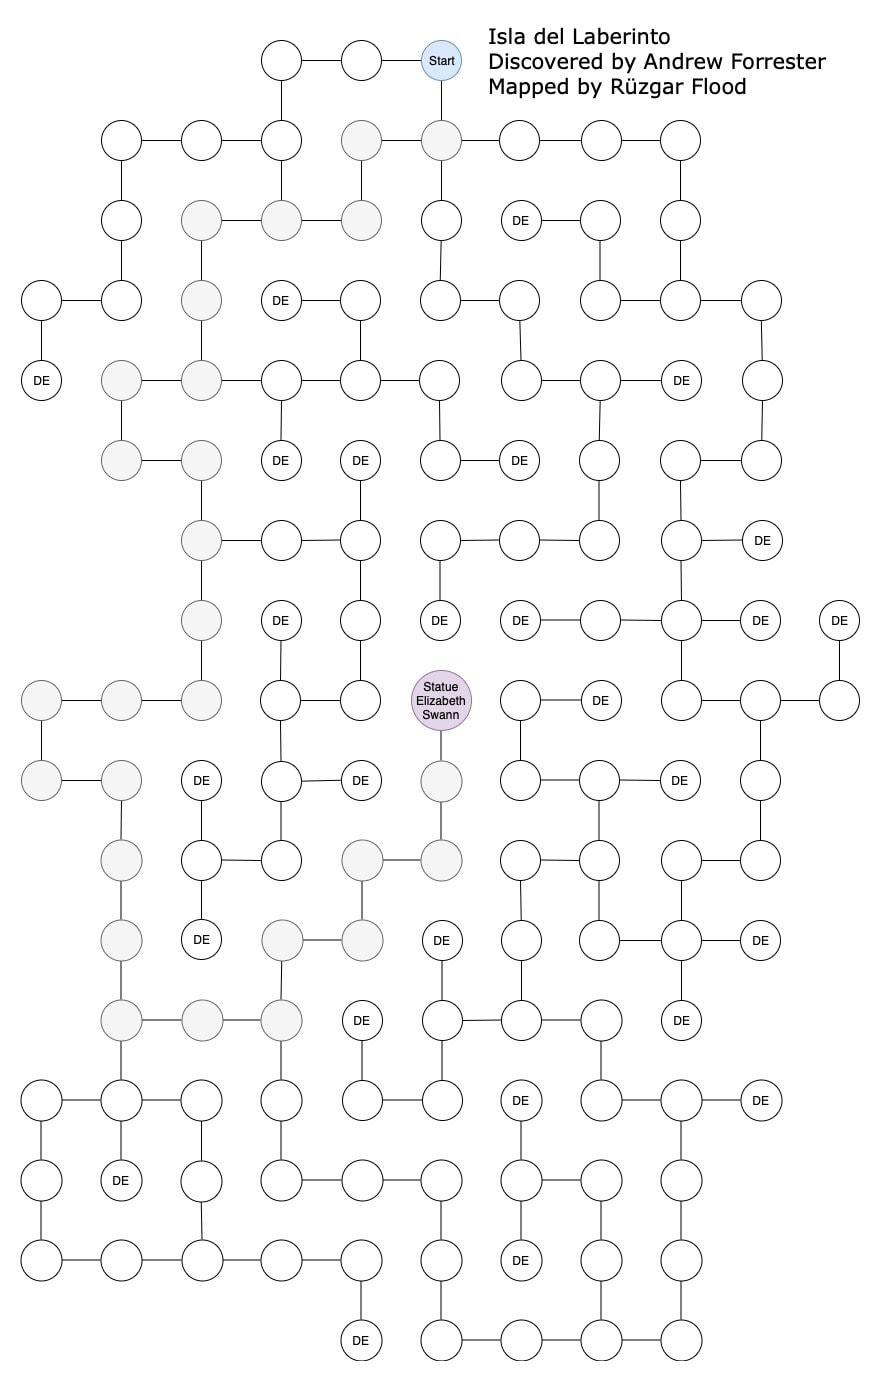
Credit: Ruzgar Flood (ID: 698090)
|
Directions: Start At Light Blue, Go To Dark Gray
S - W - S - W - W - S - S - W - S - E - S - S - S - W - W - S - E - S - S - S - E - E - N - E - N - E - N - N Use statue S - S - W - S - W - S - W - W - N - N - N - W - N - E - E - N - N - N - W - N - E - N - N - E - E - N - E - N Reward:
5 XP |
Isla De Azucar (S5 W5)
Requires Basic Cooking
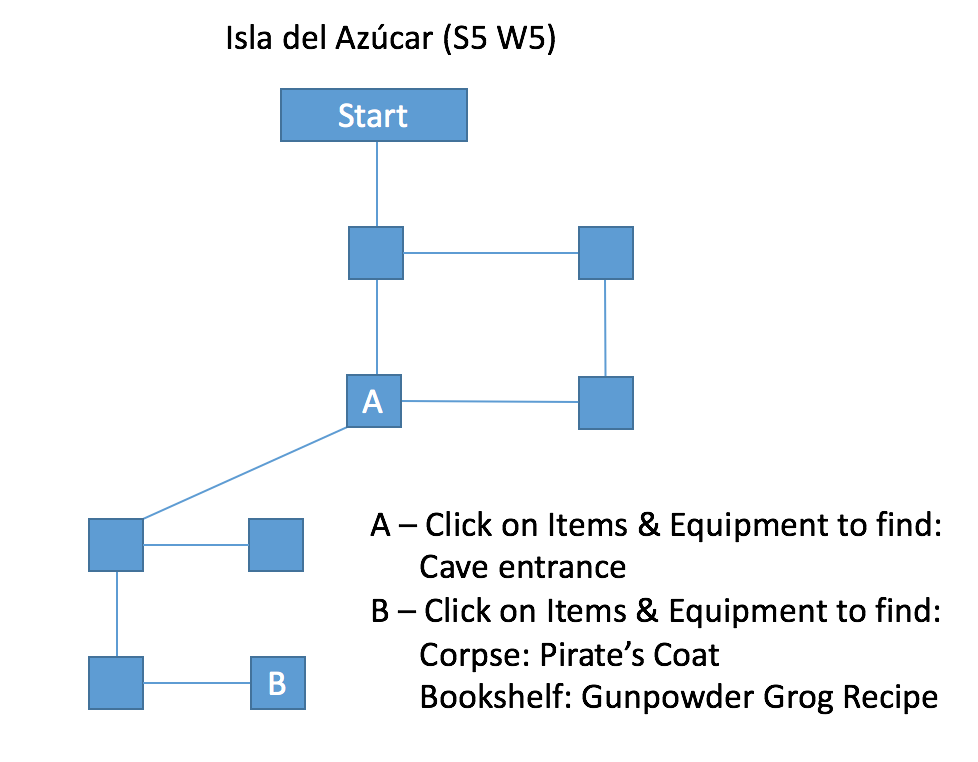
Credit: Wyatt Pratt (ID: 2352009)
|
Directions:
S - S Use Cave Entrance SW - S - E Use Bookshelf Use Corpse W - N - NE Use Cave Opening N - N Reward:
Gunpowder Grog Recipe Pirate Coat |
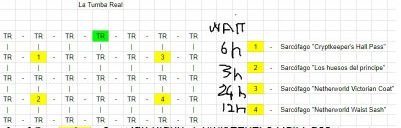
Isla de huesos reales (N11 E24)
Step Two Part A: Journey to Isla del Gobernado
Step One: Journey to "The Achievement"
WARNING: There are a lot of Pirate Skeletons and they drop your health, so be careful.
Note: I only stayed long enough to acquire the Captains key and Cryptkeepers Hall Pass, also time starts upon arrival of the island.
Step One: Journey to "The Achievement"
WARNING: There are a lot of Pirate Skeletons and they drop your health, so be careful.
Note: I only stayed long enough to acquire the Captains key and Cryptkeepers Hall Pass, also time starts upon arrival of the island.

Credit: Thomas Cook-Waterhouse (ID: 3140981) and Katja Corretja (ID:2998230) with slight edit by Tobias Deiana (ID: 2386790)
|
Items NEEDED:
Old Parchment (can be acquired on Isla de Tormenta) Directions: Start At Red, Go to 1, Go to Open End
NE - E - NE - N Use item to gain Lilac Sage Flowers S - SW - W -SW - S - SE - S - SE - SW - SW Use Corpse SE - SW - SE - E - SE - E - NE - D Open End: Start At Green, Go To Yellow # S - S - S - W - W Use Item after 3 hr N - N Use item after 6 hr (total) E - E - E - S - S - E Use item after 12 hr (total) N - N Use Item after 24 hr (total) N - W - W - U Directions Once Out of Open End SW - W - NW - W - NW - NE - NW - NE - NE - NW - N - NW - N Reward:
Lilac Sage Flowers (will be needed for another island) (1% encumbrance) Pirate Sash - purple cotton (1% encumbrance) Captians Key (3hr) Cryptkeepers Hall Pass (6 hr) Netherworld Sash (12 hr) Netherworld Coat (24 hr) |
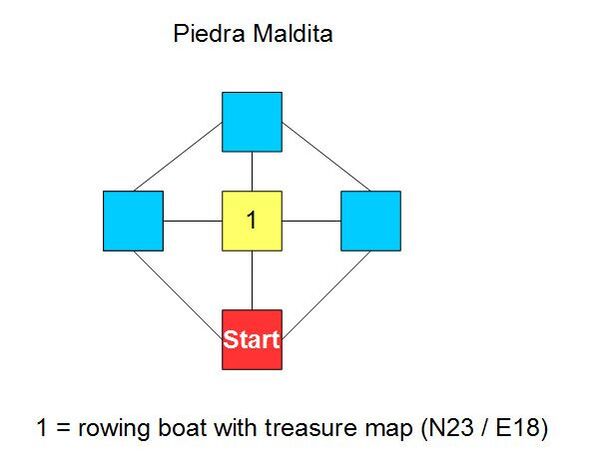
#12 piedra maldita (N25 E20)
Skip if you already have the map to Abismo (N23 E18)

Credit: Unknown (if you know the credit feel free to message me) but map pulled from post by Lestat Limbo (ID: 2832480)
|
Directions: Start At Red, Go To Yellow
N Use Rowing Boat S Reward:
Ocean Treasure Map N 23/E 18 |
#13 Ocean Map: N23 E18 (el Abismo Hambriento)
purple is tgh only
Must possess the Ocean Map N23 E18 to go

Credit: Unknown (if you know the credit feel free to message me) but map pulled from post by Lestat Limbo (ID: 2832480)
|

|
|
Items NEEDED:
Scuba Gear |
Reward:
Bag of Marbles: 10 uses Note: 20 marbles per use |
Directions: End At Purple For TGH
D (x20) - S - E - S - E - SE - W - D - SE - E - S - SE - S - SE - S - SE - E
Use item
W - NW - N - NW - N - NW - N - W - NW - U - E - NW - W - N - W - N - U (x20)
D (x20) - S - E - S - E - SE - W - D - SE - E - S - SE - S - SE - S - SE - E
Use item
W - NW - N - NW - N - NW - N - W - NW - U - E - NW - W - N - W - N - U (x20)
#14 Isla de la montana (N21 E8)
Step ?: Journey to Isla del Gobernado
Note: Of the two maps I saw this one was personally the easiest for me to read. And of course even then it is a bit of complicated map. Key is to follow Letter to Letter and Number to Number (which also have different colors and arrows).
Note: Of the two maps I saw this one was personally the easiest for me to read. And of course even then it is a bit of complicated map. Key is to follow Letter to Letter and Number to Number (which also have different colors and arrows).
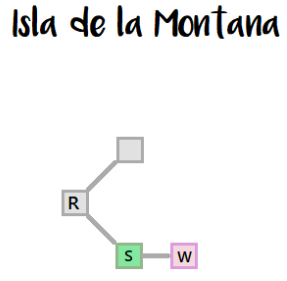

Credit: Unknown (if you know the credit feel free to message me) but map pulled from post by Lilah Eve Delaney (ID: 3323861)
|
|
Directions:
E
Use Stone Wall (will arrive in aprox 21 mins)
U - W - W - W - NW - NW - N - N - NE
E
Use Stone Wall (will arrive in aprox 21 mins)
U - W - W - W - NW - NW - N - N - NE
|
If you do NOT possess Map N28 E12
D - NE - E - E Use Cave (will take aprox 7 mins) Use Dark Pathway East (aprox 3 mins) Use Floor to gain Map Use Dark Pathway West (aprox 3 mins) Use Cave Opening (aprox 7 mins) W - SW - U Move on to directions for possessing Map N28 E 12 |
If you DO possess Map N28 E12
NE - E - E - E - SE - SE - S - S - U - N - N - U - NW - NW - D - W - W - SW - U - E - U - W - SW - D - SW - S - SE - E - D - E Use Wall (aprox 22 mins) E - NE - U - SW - NW - D - N - U - NE - E - U - SE - SW - U Use Floor (to gain key) Use View (to gain mood) Use Plank (aprox 2 mins) SE |
Reward:
Ocean Treasure Map N 28/E 12
Captain's Key
Full Mood
Found The Needle! Achievement (10 pts)
Ocean Treasure Map N 28/E 12
Captain's Key
Full Mood
Found The Needle! Achievement (10 pts)
#15 Ocean Map: N28 E12 (harket's treasure)
Must posses the Ocean Map N28 E12 to go
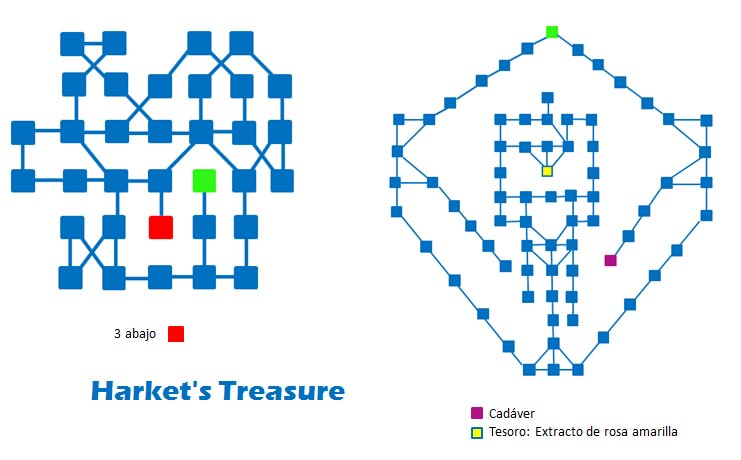
Credit: Unknown (if you know the credit feel free to message me) but map pulled from post by Adhara Callejon (ID: 1909021)
|
Directions:
D - D - D - N - W - S - S - E - E - N - N - D - SW(x6) - S - S - SE - SE - SE - SE - NE - N - N - N - N - NW - W - N - N - N - E - SE Use box NW - W - S - S - S - E - SE - S - S - S - S - SW - NW - NW - NW - NW - N - N - NE(x6) - U - S - S - W - W - N - N - E - S - U - U - U |
Items NEEDED:
Suba Gear Ocean Map N28 E12 Reward
5 XP Yellow Rose Extract |
#16 Isla del craneo (N25 W3)
Step ?: Journey to Isla del Gobernado
WARNING: This map transports you places, like legitimately moves you around the map section you are in. Look out for the green update bar at the top that says you lost your way. For some reason I don't remember reading this map was one of those awful maps so I was confused at first.
WARNING: This map transports you places, like legitimately moves you around the map section you are in. Look out for the green update bar at the top that says you lost your way. For some reason I don't remember reading this map was one of those awful maps so I was confused at first.

|
NEEDED Items
Old Parchment (acquired on Tormenta) Directions IN THEORY:
S - SE - E - SE - SW - NW - E - SE - SE - S - SW - N - SE - E - NE - NE - S - SW - NW - N - NE - NE - SE - S - S - W - N - N - W - N - U - NW - NW - N - NE - NW - NE - E - E - SW - E - SE - SE - NE |
Reward
Captains Key Directions IN REALITY:
Follow the blue path on the map but once you are transported look for squares that you could be at. Luckily it doesn't look like you get moved too far from where you were... but it is annoying. |
Use Tree Stump
Use Pathway to Boat (aprox 36 mins)
Use Pathway to Boat (aprox 36 mins)
#17 Isla del monolito (N8 W5)
Skip the Yellow Route if you already have Ocean Map N20 W12

Credit: Unknown (if you know the credit feel free to message me)
|
Directions: Start On Red, Go To Blue
SW - S - S - SE - SW - S - E - SE - SE - W Use item E - NW - NW - W - N - NE - NW - N - N - NE Directions: Start On Red, Go To Yellow (Skip if you already possess Ocean Map N20 W12)
E - NE - NE - N Use item S - SW - SW - W Reward:
5 XP Ocean Treasure Map N 20/W 12 (1% encumbrance) |
#18 isla tortugita (N1 W25)
Skip if you already possess the compass needed for Isla de la Trinadad (S18 E27)
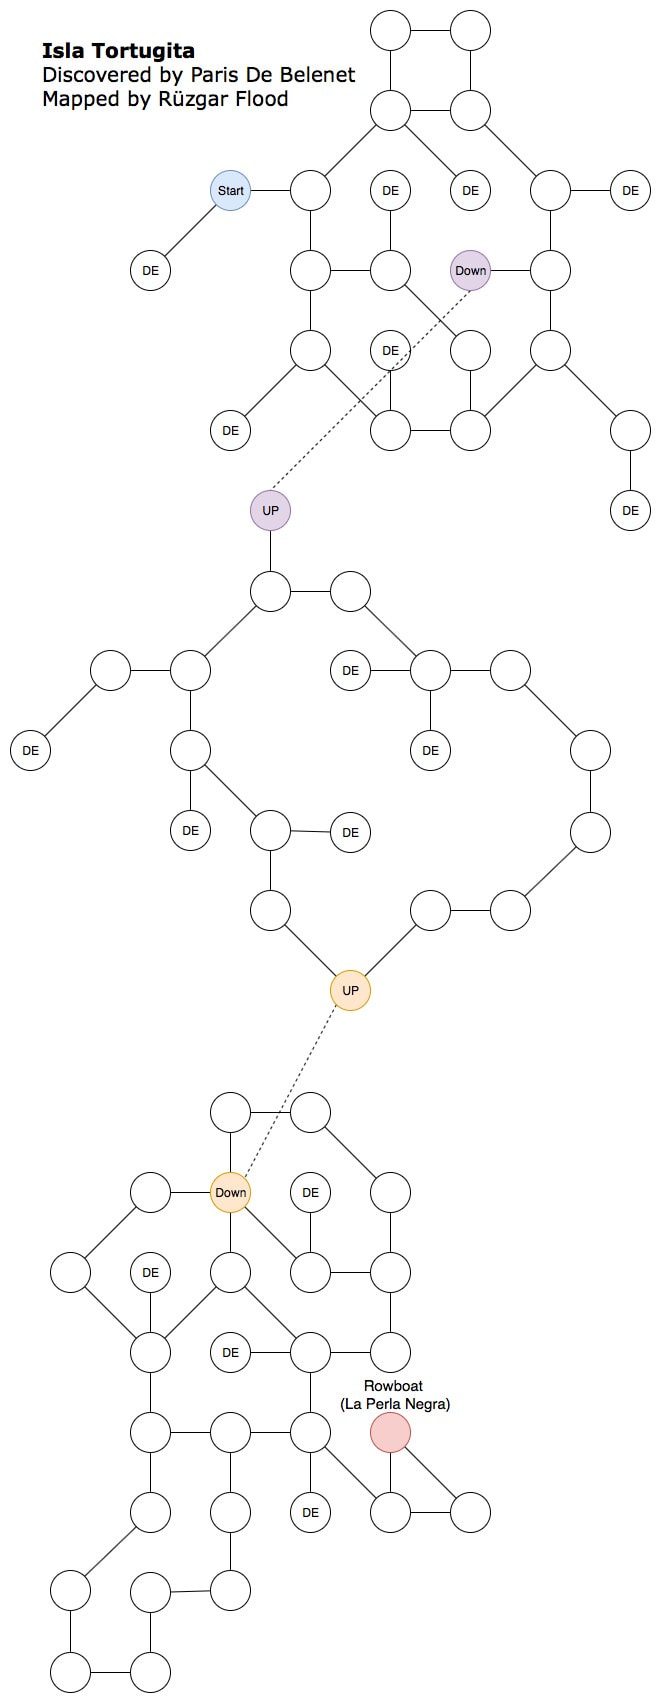
Credit: Ruzgar Flood (ID: 698090)
|
Directions:
Start On Blue, Go To Red E - NE - E - SE - S - W - D - D - S - SW - S - SE - S - SE - U - S - SE - S - SE - N Use Rowboat S - NW - N - NW - N - D - NW - N - NW - N - NE - N - U - U - E - N - NW - W - SW - W Reward:
Compass (will need for another Island) |
#19 Isla de las gaviotas (N22 W21)
WARNING: Do NOT go with low health. Beware of seagulls
Credit: Clifton Wooten (ID: 3415931)
|
Directions:
S - SW - S - SE - E - SE - N Use Fireplace S - NW - W - NW - N - NE - N Reward:
Kentucky Fried Seagull (will need for later Island) |
#20 Ocean Map: N20 W12 (davy jones)
Reward refers to tgh only
Need to posses the Ocean Map N20 W12 to go
Credit: Unknown (if you know the credit feel free to message me)
|
Items NEEDED:
Scuba Gear Fried Seagull (Found on Gaviotas) Directions:
D (x7) - S - S - SW - W - SW - D - E - SE - S - S - SE - SE - S - S - SE - S - SE - S - E - SE - NE - N Use Fireplace S - SW - NW - W - N - NW - N - NW - N - N - NW - NW - N - N - NW - W - U - NE - E - NE - N - N - U (x7) Reward:
Heist Blueprint: 5 uses |
Isla de la trinidad (S18 E27)
Note: Click image for larger map

Credit: Ruzgar Flood (ID: 698090)
|
Note:
Order I chose to do the Statues is Love, Truth then Faith Directions: Start On Blue, Go To Green, Go To Purple
W - NW - W - S - W - NW - S - S - SW - E Use Statue (Love) W - NE - N - N - SE - E - N - E - SE - E - E - NE - E - E - E - E - NE - E - SE - S - SE - E Use Statue (Truth) W - NW - N - NW - W - SW - W - W - W - W - SW - W - S - SE - S - SE - S - SE - SW - S - S - S - SW - E - S Use Statue (Faith) N - W - NE - N Use Monolith N - N - NE - NW - N - NW - N - NW - N Reward:
5 XP |
#22 Isla de tormenta (S13 E28)
Step ?: Journey to Isla del Gobernad

Credit: Tobias Deiana (ID: 2386790) based on map by Unknown.
|
Directions:
W - W - SE - S - SW - W Use Gate (aprox 7 mins) N - W - SW - NW - S - U - U - S - W Use secret door (aprox. 8 mins) Use Cabinet Use Door (aprox 8 mins) E - N - D - D - N - SE - NE - E - S Use Gate (Aprox 7 mins) E - NE - N - NW - E - E |
NEEDED Items:
All 3 Captains Keys (acquired from Montana, Huesos Reales, and Craneo) Reward:
5 XP Eye Patch (1% Encumbrance) Dancing Slippers (needed for another island) (2% Encumbrance) |
#23 Isla del gobernador (S15 E15)
UNCHECKED
Step ?: Final Destination Isla del Gobernad
Credit: Alamo Littleton (ID: 3221055)
Empty Islands
Isla Del conejo (N18 E16)
Credit: Unknown
|
Isla del Covfefe (S1 E21)
Credit: Unknown
|
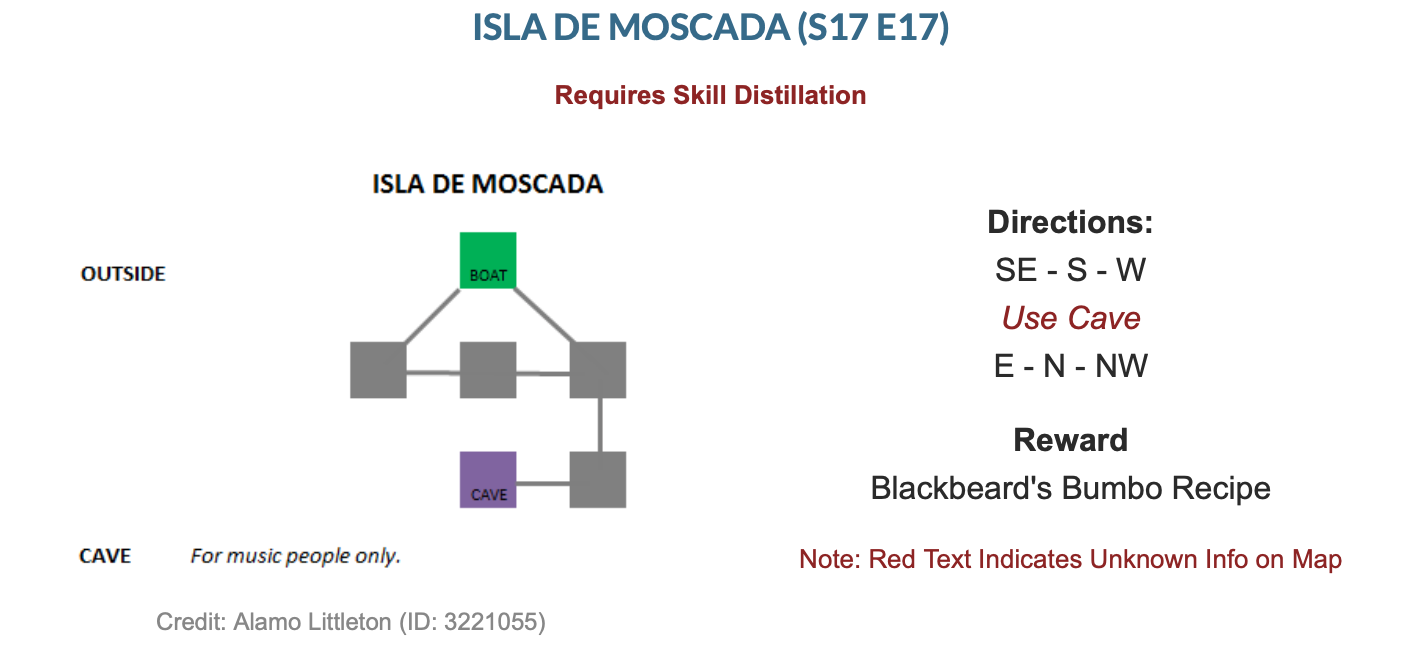
Isla de Moscada (s17 E17)
Requires Skill Distillation
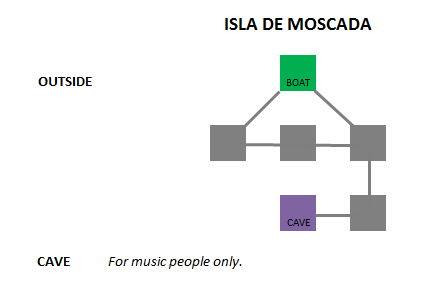
Credit: Alamo Littleton (ID: 3221055)
|
Directions:
SE - S - W Use Cave E - N - NW Reward
Blackbeard's Bumbo Recipe Note: Red Text Indicates Unknown Info on Map
|
iSLA de patatas (N13 E19)
No map found
Isla de vinos (N26 W26)
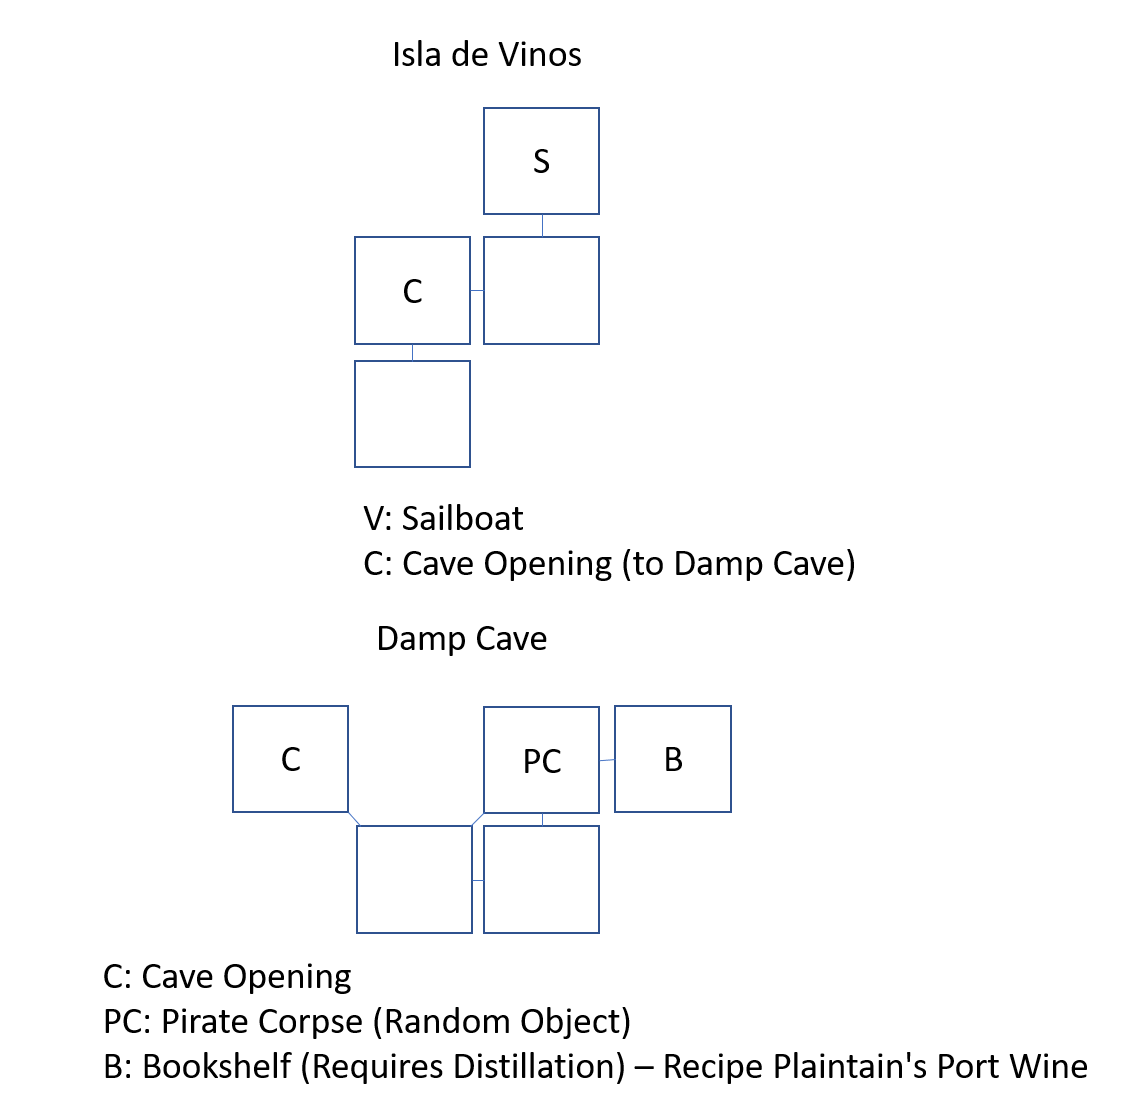
Credit: Agustin Cereceda (ID: 193990)
|
NEEDED
Distillation Skill (Unknown minimum) Directions:
S - W Use Cave Opening SE - NE - E Use Bookshelf W - SW - NW Use Cave Opening E - N Reward
Plaintain's Port Wine |
Treasure from Erich Zann
(Popmundo Only)
Step 1: Piedra Maldita (n25 e20)
Skip if you already have the map to Abismo (N23 E18)
VERIFIED
VERIFIED
Credit: Unknown
|
Directions: Start At Red, Go To Yellow
N Use Rowing Boat S Reward:
Ocean Treasure Map N 23/E 18 |
Step 2: N23 E18 (EL ABISMO HAMBRIENTO)

Credit: Unknown
|

Credit: Unknown
|
|
Items NEEDED
Scuba Gear |
Reward
Paranormal Skill |
Directions: End At Red For Popmundo
D (x20) - S - E - S - E - SE - W - D - SE - E - S - SW - S - SW - S - E - SE - SE - S
Use item
N - NW - NW - W - N - NE - N - NE - N - W - NW - U - E - NW - W - N - W - N - U (x20)
D (x20) - S - E - S - E - SE - W - D - SE - E - S - SW - S - SW - S - E - SE - SE - S
Use item
N - NW - NW - W - N - NE - N - NE - N - W - NW - U - E - NW - W - N - W - N - U (x20)
step 3: Isla de Erich zann (n3 w16)

Credit: Unknown
|
You need paranormal sience skill to use it, which you can get at Piedra Maldita,
|
Kill/Save the Cracken Achievement
(BOTH Popmundo & tgh)
Note: I am not sure I understand this part of the Seven Seas so there is currently NO info on the weebly since I don't quite understand it myself.
STEP 1: ISLA DEL PULPO (s10 w20)
STEP 2: S17 W5
STEP 3:
ISLA DEL PEZ ROJO (n1 w11)
or
ISLA DEL PEZ VERDE (s18 e8)
OR
ISLA DEL PEZ AZUL (n16 e6)
sTEP 4: LA MADICION DE MCCRACKEN (n17 E1)
treasure from corazon
(both popmundo & tgh)
step 1: olas peligroses (n8 w20)
Credit: Unknown
|
Get wedding invitation before Corazon de Piedra
|
step 2: corazon de piedre (s30 e24)
Credit: Unknown
|
NEEDED Items
Wedding Invitation (can be acquired on Olas Peligroses) Directions
SE - NE -S - NE - SE - S - SE - S - SW - S - SW - NW - S - S - SW - N - W Go To Items and Use Wedding Invitation E - S - NE - N - N - SE - NE - N - NE - N - NW - N - NW - SW - NW Reward
Using Wedding Invitations Counts as Treasure Note: Red Text Indicates an Unknown Action
|
"Found true love" achievement
(both popmundo & tgh)
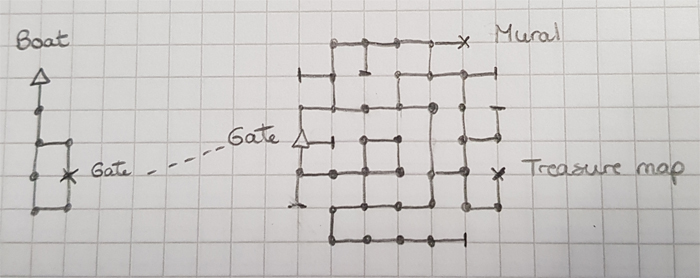
step 1: la isla maldita (n30 w14)
Credit: Unknown
|
this is the map. first go to the yellow marked area and use the monolith. then the gate in the circle will be opened. and we're entering the crypt using it. monolith has 4 hours cooldown. to exit crypt also needs to spend 4 hours inside.
after you arrived the crypt sw-s-se-e-ne-s-s-sw-s-se-e-se-s-s-sw then you'll find the tombstone and you need a shovel to use it. when you use the tombstone you'll gain a treasure and netherworld legion cutlass. it can be used for fighting zombies. |
Credit: Unknown
|
step 2: isla de pagono (n6 e19)
Starting Directions:
S - S - E - S
Use Gate to El Castillo
S - S - E - S
Use Gate to El Castillo
WARNING: Map is different for everyone at this point, here are some examples of the map, click on map for larger view. You have to find a treasure map to el Abismo de Anguilas and also use the mural or you won't be able to land on Isla de Locura.

Credit: Unknown
|
Credit: Unknown
|

Credit: Unknown
|

Credit: Unknown
|
step 3: s4 e5 (el abismo de anguilas)
Credit: Unknown
|
Get the Six Fingered Fencing Glove to fight the brute in Isla de Locura.
|
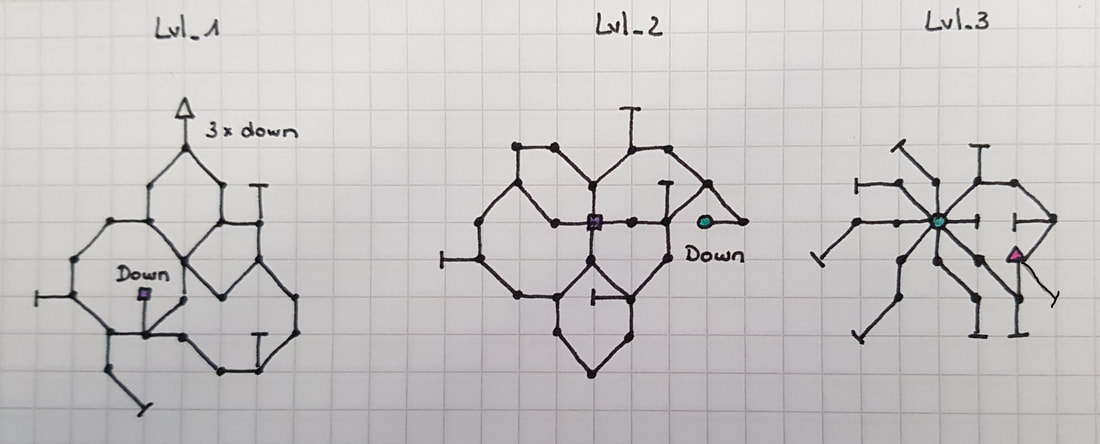
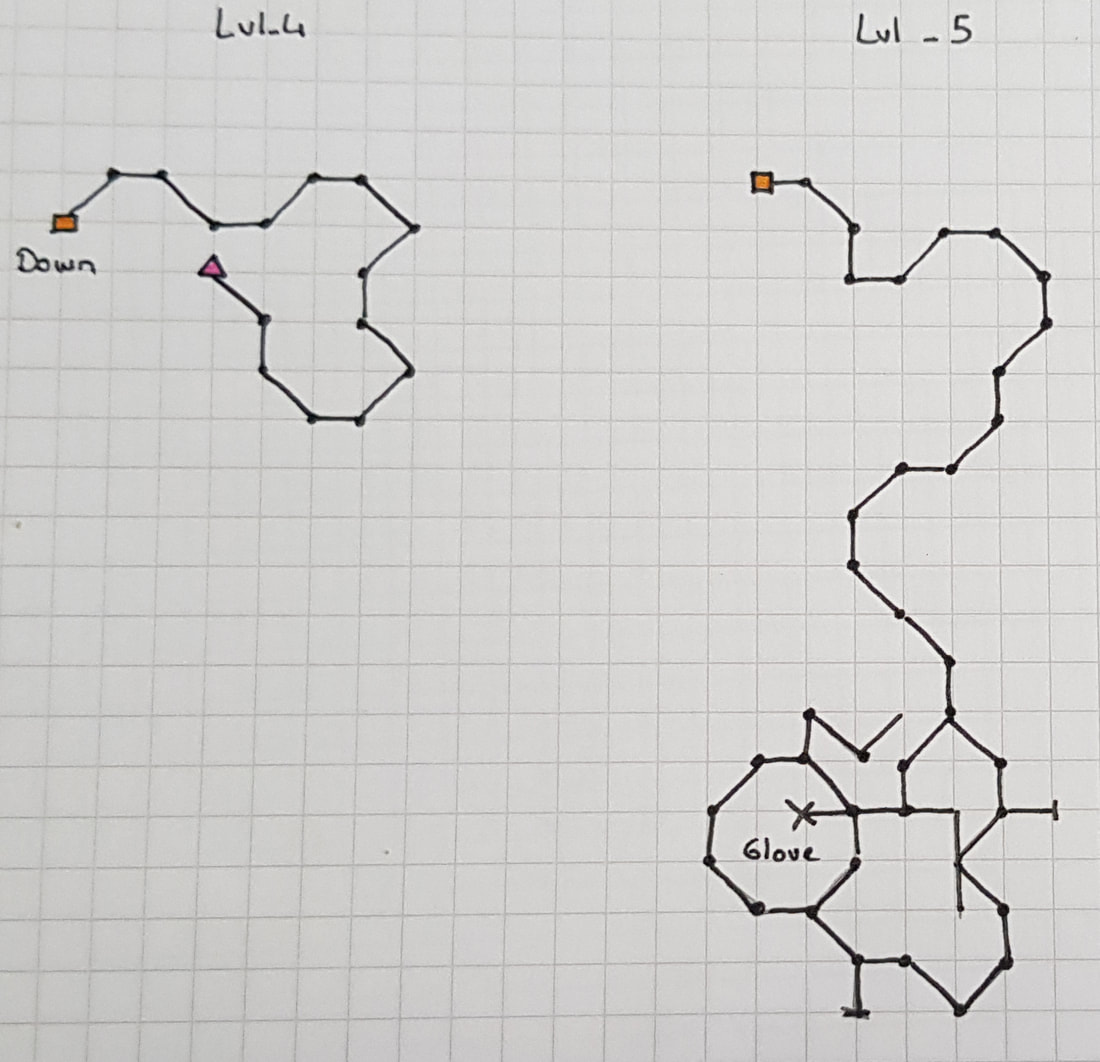
step 4: isla de locura (s25 w3)
Credit: Unknown
|
Fight the brute with the glove and a cutlass (netherworld or credit one) and gain treasure map S4 / E13. You need to pick between 3 techniques, Agrippa, Thibault and Capo Ferro. What worked for me was to use Agrippa until I got a win, then Thibault.
|
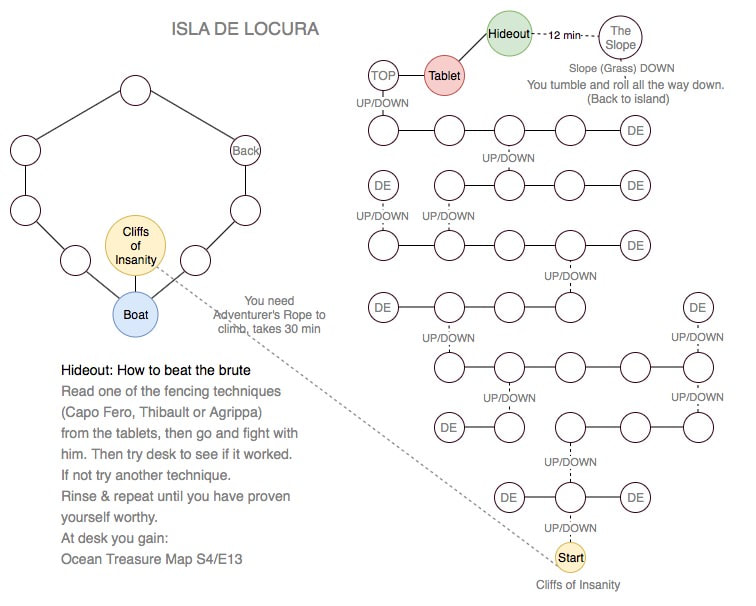
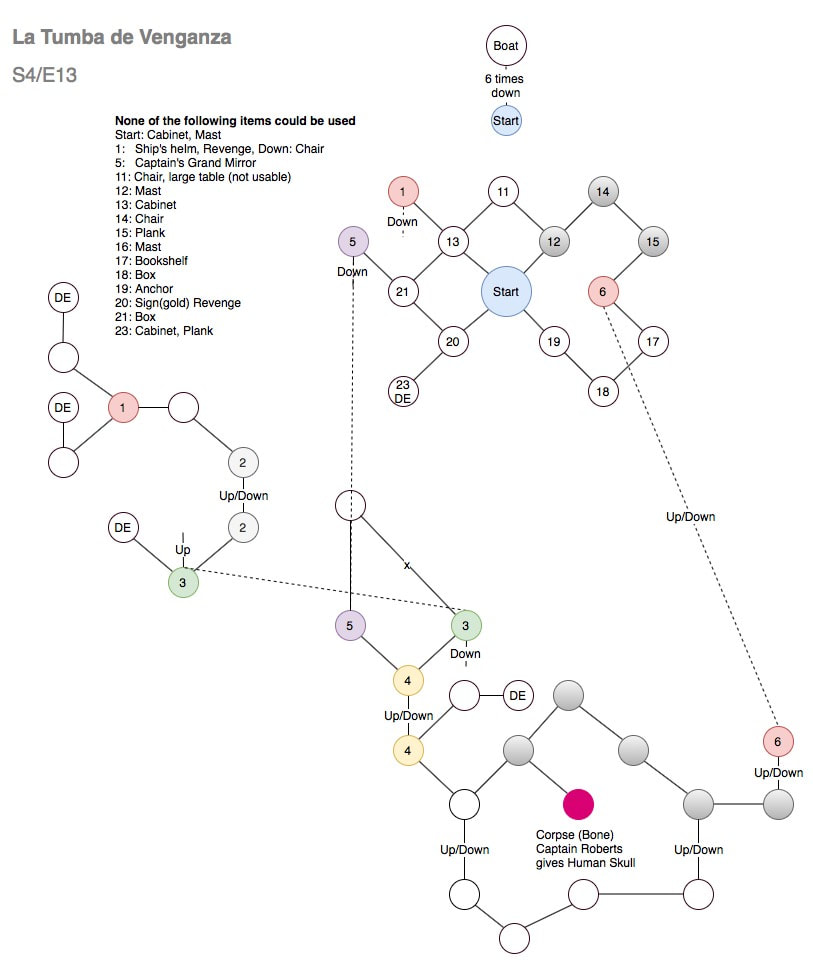
step 5: s4 e13 (la tumba de venganza)
Credit: Unknown
|
Gain human skull and go back to Pagano, a sarcophage appeared in the middle of the castillo, use the skull here and gain your achievement.
|
isla del signo (n7 w27)
VERIFIED
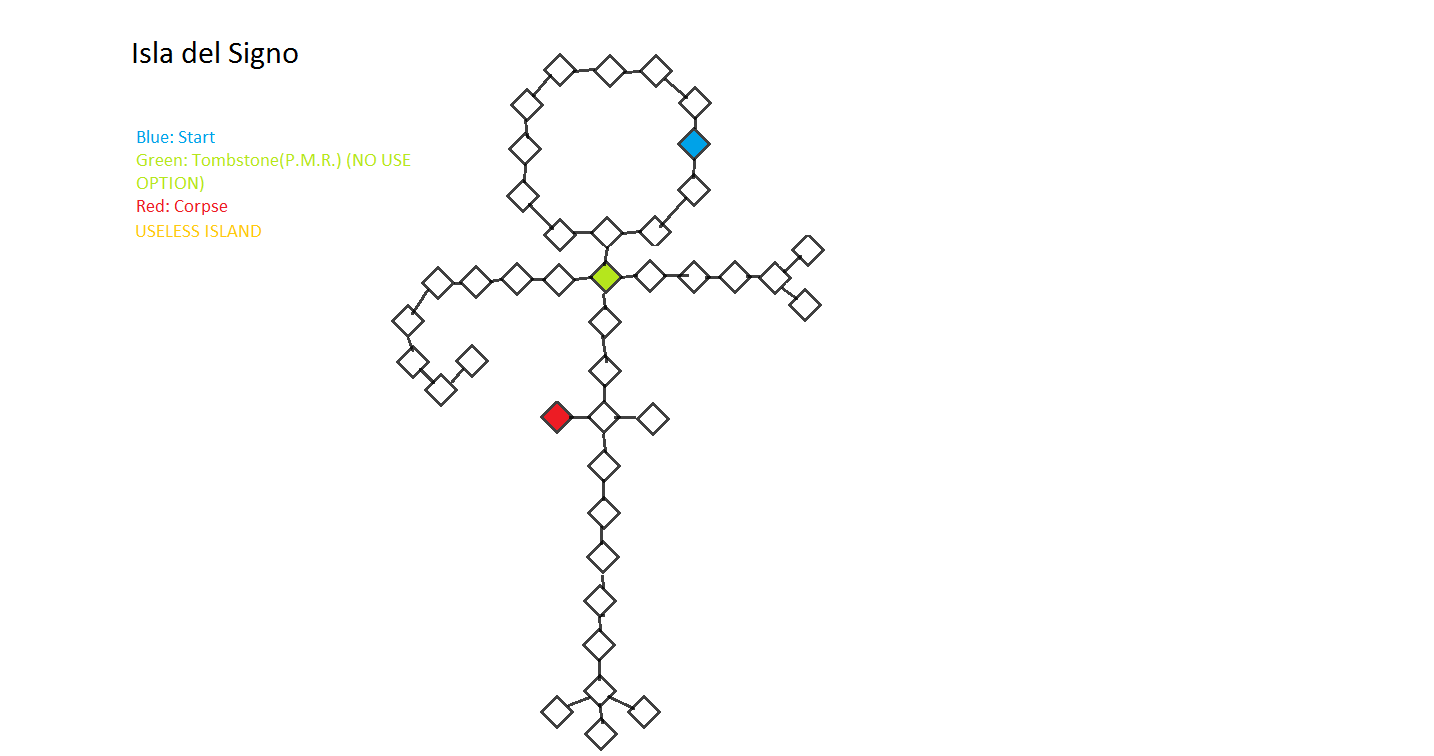
Credit: Unknown
|
Items NEEDED
Lilac Sage Flowers (can be acquired from Huesos Reales) Directions:
S - SW - W - S Got to items and use Lilac Sage Flowers N - E - NE - N |
Reward
The Achievement (10 pts)
The Achievement (10 pts)
isla de espejos (s3 w31)
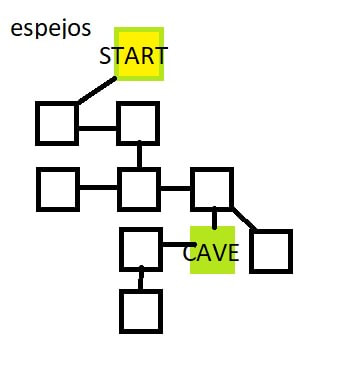
Credit: Unknown
|
wearing these items:
Pirate Hat Pirate Coat Pirate Shirt Pirate Sash Pirate Jacket Pirate Boots Pirate Pants Use Mirror and get the achievement "It's a Pirate's Life For Me" |
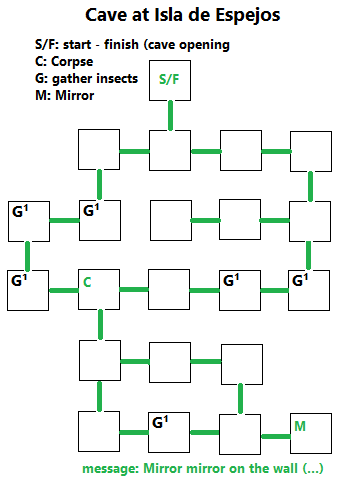
Credit: Unknown
|
isla de heusos malditos (n13 W21)
VERIFIED
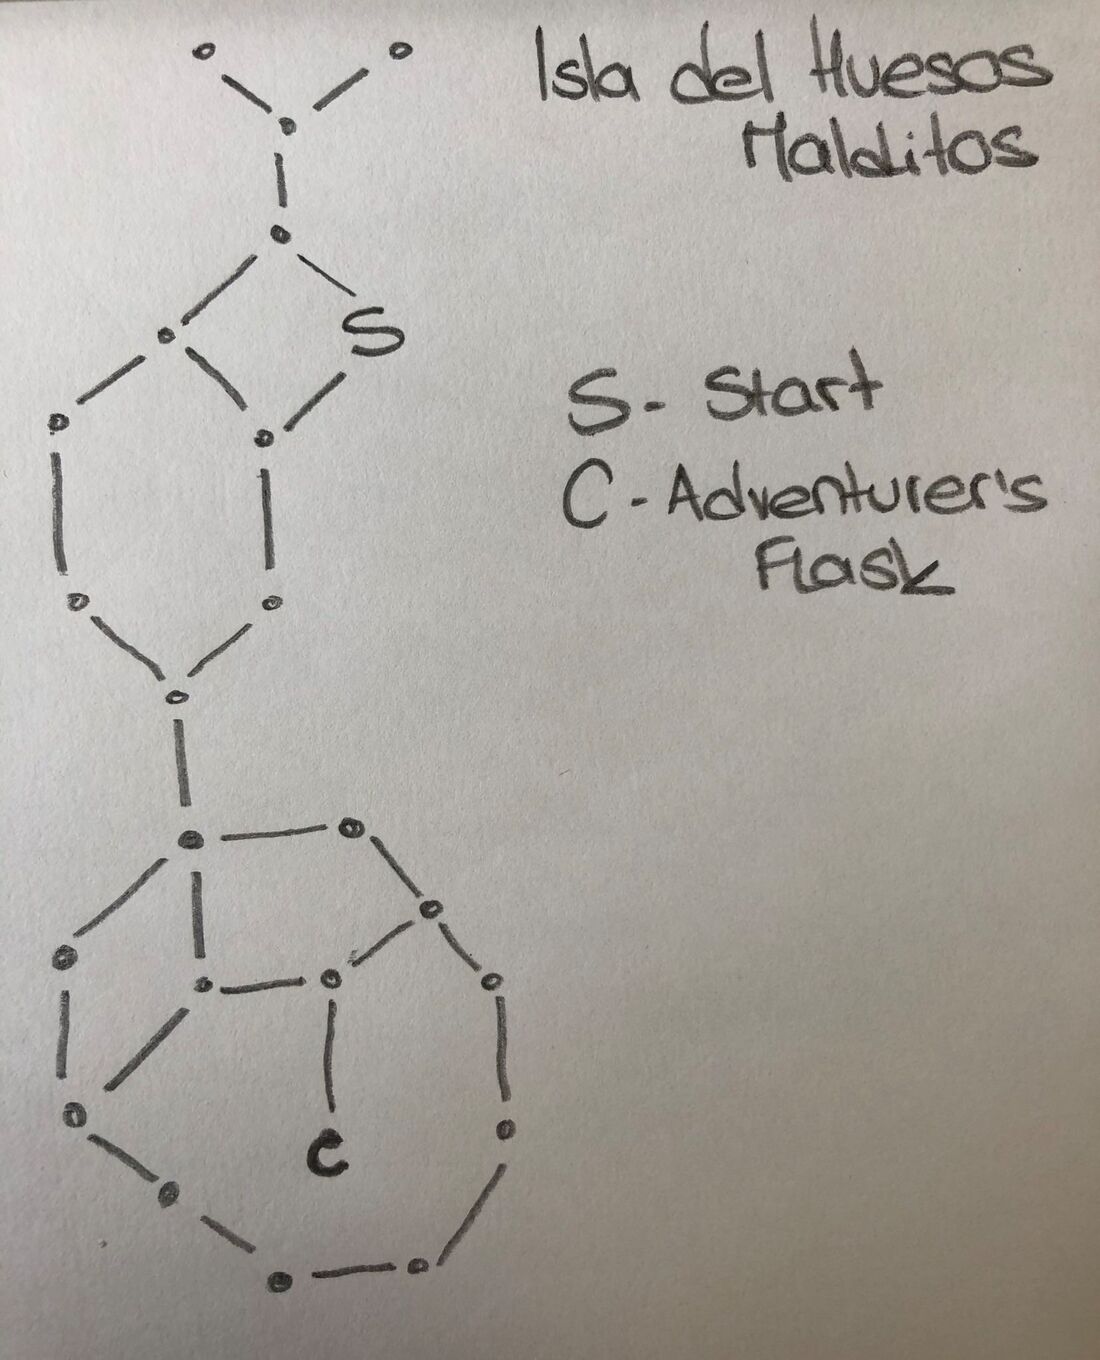
Credit: Wyatt Pratt (ID: 2352009)
|
Directions:
SW - S - SW - S - S - E - S Use Item N - W - N - N - NE - N - NE Reward
Adventurer's Flask |
