At The Mountains of Madness
Note: In order to complete this quest you will need to be in a three man team. This has to do with after you use the injection. Also, if you have multiple characters from your account going it is reported that it takes longer to do (since there seems to be a delay of when they can start their journey). Also, you will want to keep a low encumbrance when entering as it will fill fast.
Credit: Helped made with information posted by Barker Bradley (ID: 380962)
Maps were taken from a post made by Priscilla Rouve (ID: 81942) with unknown creators translations done with google translate
Credit: Helped made with information posted by Barker Bradley (ID: 380962)
Maps were taken from a post made by Priscilla Rouve (ID: 81942) with unknown creators translations done with google translate
|
Expected Time Frame:
9+ days Characters on the same account: There is a 5 day delay between each entering the quest |
Rewards:
Starchild Achievement (50 pts) Hard Boiled Achievement (10 pts) 30 XP OR Rejuvenation to any age 16+ |
|
Items NEEDED:
Saturn V Coin OR Boarding Pass (credit items that can also be purchased in the WTF) |
Items you may WANT:
Mood and health recovery things Pin "We come in Peace" (protects against spiders) Emergency Oxygen Tanks |
Credit on Maps: Unknown (if you know who made them feel free to message me) but were taken from a post by Priscilla Rouve (ID: 81942)
Note On Map Translations: Adding translations to the maps was done under request. If you spot any errors please let me know. Not every translation is literal as languages don't always work that way. I also used google translate to translate so there is definitely room for error.
This locale is located in Los Angeles.
E.T. Highway

|
Directions:
Use Mercedes Benz (will take aprox 2 hrs) W - NW - N Use the cupboard and the desk If you possess the boarding pass Use the door (will take aprox 2 hrs) If you possess the Saturn V Coin Use the payphone S - SE - E - E- NE - E Use the Chair at Bus Stop (will take aprox 2 hrs) |
Area 51
|
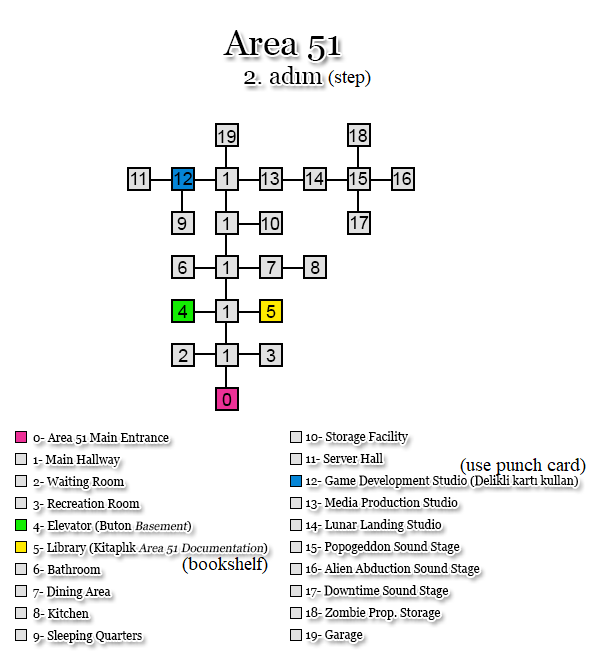
AREA 51
Go to Library (YELLOW #5) N - N - E Use Area 51 bookshelf (you will receive a punch card) Go to Game Studio (BLUE #12) W - N - N- N- W Go to items, use punch card (you will receive password) Go to Elevator (GREEN #4) E- S- S- S- W Use elevator (will take aprox 36 mins)
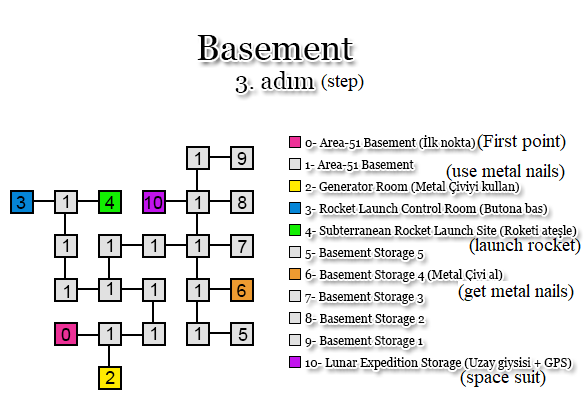
BASEMENT Go to Generator Room (YELLOW #2) E - S Use Rocket Launch System Generator Go to Basement Storage 4 (ORANGE #6) N - E - N - W - N - E - E - S - E Use Box of Metal Nails (you will receive a metal nail) Go to Lunar Expedition Storage (PURPLE #10) W - N - N - W Use box of Essential Equipment (you will receive Space Suite and GPS) Go to Generator Room (YELLOW #2) E - S - W - W - S - E - S - W - S Go to inventory and use metal nail Use Rocket Launch System Generator (Note you will get an error message, just move to the next step) Go to Rocket Launch Control Room (BLUE #3) N - E - N - W - W - N - N - W Use the Ignition sequence button Go to Subterranean Rocket Launch Site (GREEN #4) E - E Use the Space Rocket Saturn V (will take aprox 2 d and 12 hrs) |
Acquiring the easter egg
WARNING: Be very careful with your steps. You will run out of oxygen quickly.
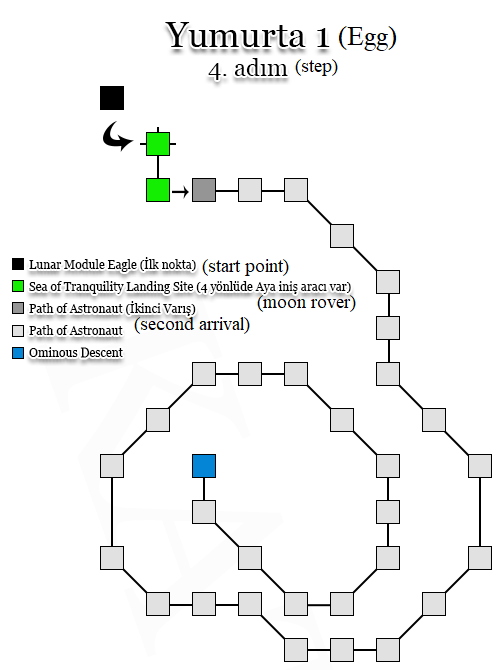
Yumurta (Egg) 1
Collect Emergency Oxygen Tank Use Airlock (will take aprox 8 minutes) S Use Astronaut Path (will take aprox 17 mins) Go to the Ominous Descent (BLUE) E - E - SE - SE - S - S - SE - SE - S - SW - SW - W - W - NW - W - W - NW - N - NE - NE - E - E - SE - SE - S - S - SW - W - NW - NW - N Use Pit to Dark Cave (will take aprox 17 mins) Yumurta (Egg) 2
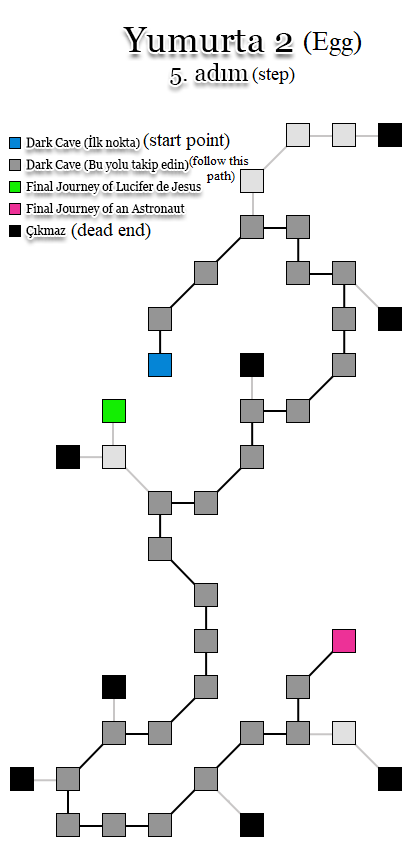
Go to PINK point N - NE - NE - E - S - E - S - S - SW - W - S - SW - W - S - SE - S - S - SW - E - SW - S - E - E - NE - NE - E - N - NE Use Apollo Crew Return to BLUE point SW - S - W - SW - SW - W - W - N - NE - E - NE - N - N -NW - N - E - NE - N - E - NE - N - N - W - N - W - SW - SW - S Use Cave Opening (will take aprox 17 mins) |
Yumurta (Egg) 1 Return Trip
S - SE - SE - E- NE - N - N - NW - NW - W - W - SW - SW - S - SE - E - E - SE - E - E - NE - NE - N - NW - NW - N - N - NW - NW - W - W Use pathway (will take aprox 17 mins) N Use lunar lander (will take aprox 8 mins) Refill Oxygen tank Use sea of tranquility airlock (will take aprox 8 mins) |
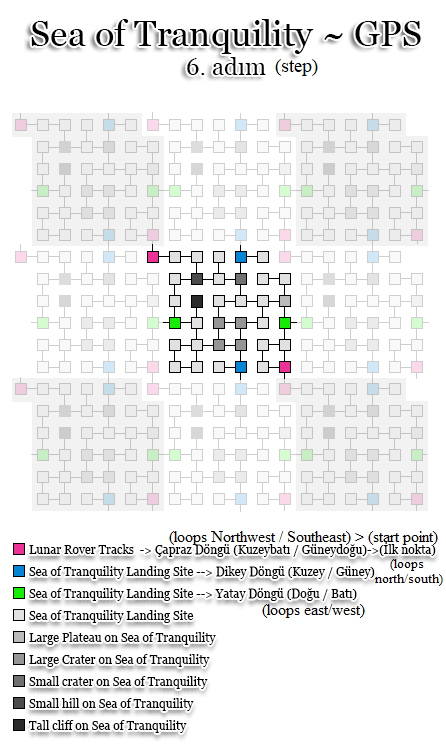
GPS
WARNING: Be very careful with your steps. You will run out of oxygen quickly. I suggest not going below 25% on oxygen before using the tank. If you do reach 25% and are out of emergency oxygen tanks, return to the Lunar Landing Note: Site to refill the tank. The PINK point will take you back.
Note: You can only use the GPS every 3 minutes.
Note: You can only use the GPS every 3 minutes.
|
Directions:
Upon Arrival E Use LRV Tracks Path (will take aprox 18 mins) YOU START AT THE PINK POINT This is where it gets tricky. The Rover is not a set distance away or in a specific place. The GPS will give you random directions. Be careful though, you will run low on oxygen if you are not. You lose oxygen over both time and steps. So even if you don't move, I am pretty sure you oxygen will drop. Also keeping in mind that you can use the GPS every three minutes. Expect to need to use an emergency oxygen tank if you have one. Some people find the Rover in the first 10 updates and others use well over 30 directions. But when you do find the Rover, when you use the GPS it will tell you so and the Rover will appear. Use the Rover (will take aprox 2 hrs and 6 mins) |
Moon Base
Note: No oxygen is lost on the moon base or excavation site.

|
Directions:
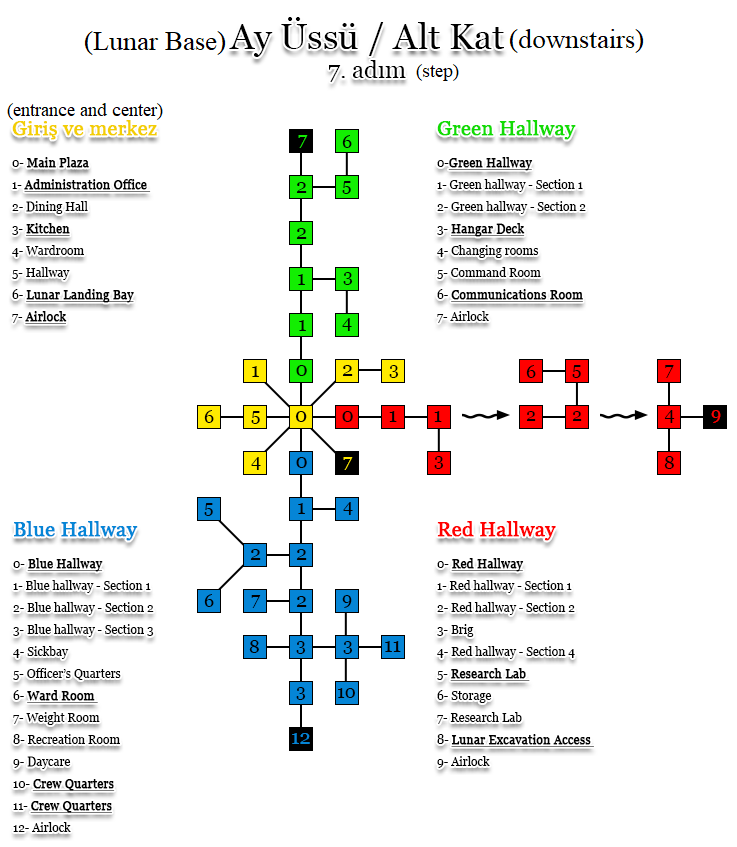
Arrival Location: Landing Bay (YELLOW #6) Go to the Administration Office (YELLOW #1) E - E - NW Use the cabinent (will receive a BLUE access card) Go to BLUE Hallway (BLUE #0) SE - S Note: If when you try to use the door and computer terminal it gives the error message, the alarm is probably on. NEXT STEP IF SO If you can't access the hallway because the alarm is on, follow the next set of directions |
If the Alarm is ON
Go to the Kitchen (YELLOW #3) N - NE - E Use cabinet to acquire Toaster Go to Airlock (YELLOW #7) W - SW -SE Throw the toaster out the airlock Go to the Security Room (Not on map) NW - U - S Deactivate Alarm Go to BLUE Hallway (BLUE #0) N - D - S Use computer terminal Note: Refresh the explore locale button to proceed |
For non Crystal readers
Directions
Starting Point is BLUE #0
Go to Crew Quarters (BLUE #11)
S - S - S - S - E - E
Use Ted Harvard's Corpse (will acquire GREEN access card)
(IF you intend to be a crystal reader go to the Crystal reader section otherwise continue on)
Go to Hangar Deck (GREEN #3)
E - E - N (x9) - E
Use Space Shuttle (will take aprox 20 mins)
When you hit the beginning of the green hallway use the computer terminal and refresh explore locale button to proceed
For Crystal Readers COMpletely unchecked
Note: Readings are good for 24 hrs midnight to midnight (quest time). Be sure to check the forums for the current readings and to post the readings once done.
|
Directions: (UNCHECKED)
Follow the instructions for acquiring the GREEN access card Starting Point is BLUE #11 Go to Ward Room (BLUE #6) W - W - N - N - W - SW Use Large table (will receive Sonic Screwdriver) Note: This is the common location but may be located elsewhere Go to Communications Room (GREEN #6) NE - E - N (x8) - E - N Use Desk (will receive RED access card) Go to RED Hallway (RED #1) S - W - S (x5) - E - E - E Note: The direction you need is not visible Go to items and use sonic screwdriver Use security door |
Directions Cont.
Starting Point is RED #2 Go to Research lab (RED #5) E - N Use Locker (will receive Spectrometer) S Go to items, use screwdriver Use security door Starting point is RED #4 Go to Lunar Excavation Access (RED #8) S Use airlock (will take aprox 1 hr) RETURN Directions from Lunar excavation site
|
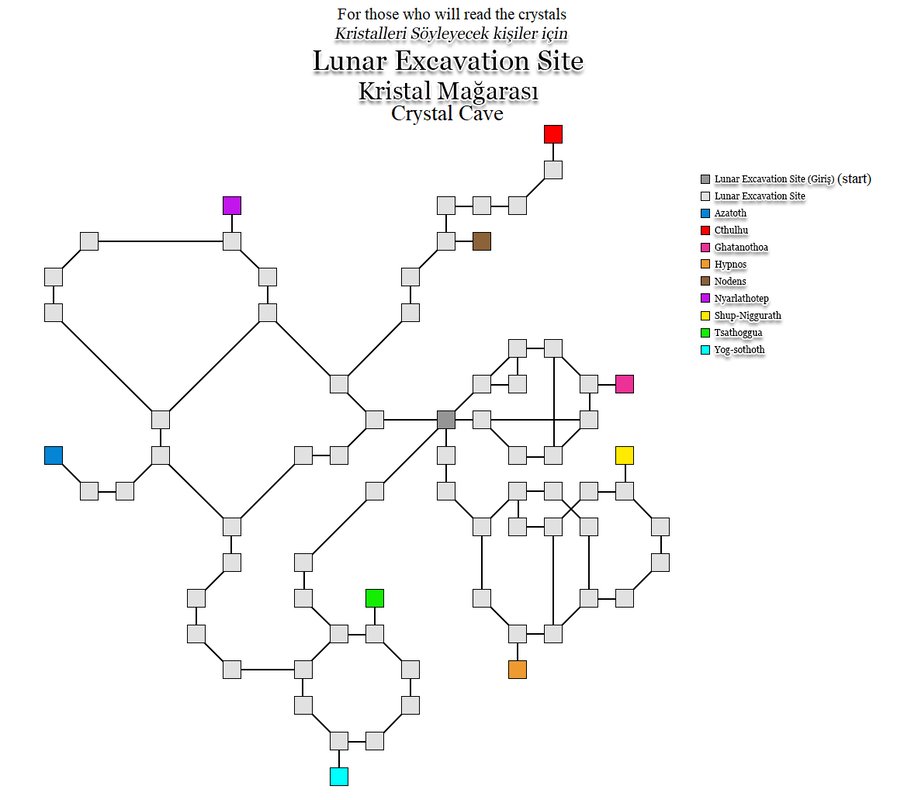
Directions for Lunar Site for Crystal Readers
Starting Point is DARK GREY
You will need to go to EACH and every crystal until you have three "named" crystals. If a crystal is part of the three it will have a full name, if it is not it will simply read as "strange crystal"
As you locate the Crystals be sure to use the spectrometer to ensure that the crystals will show up on the terminal. The terminal is something that those on the Red Planet need to use to find out the order of the crystals.
When you complete this task, simply use the starting point to return to the Moon Base
|
Return From Lunar Landing
Starting Point is RED #8 Go to Hanger Deck (GREEN #3) N Use security door Starting point is RED #2 E Use Security Door Starting Point is RED #1 E - E - E - N - N - N - E Use Space Shuttle (will take aprox 20 mins) |
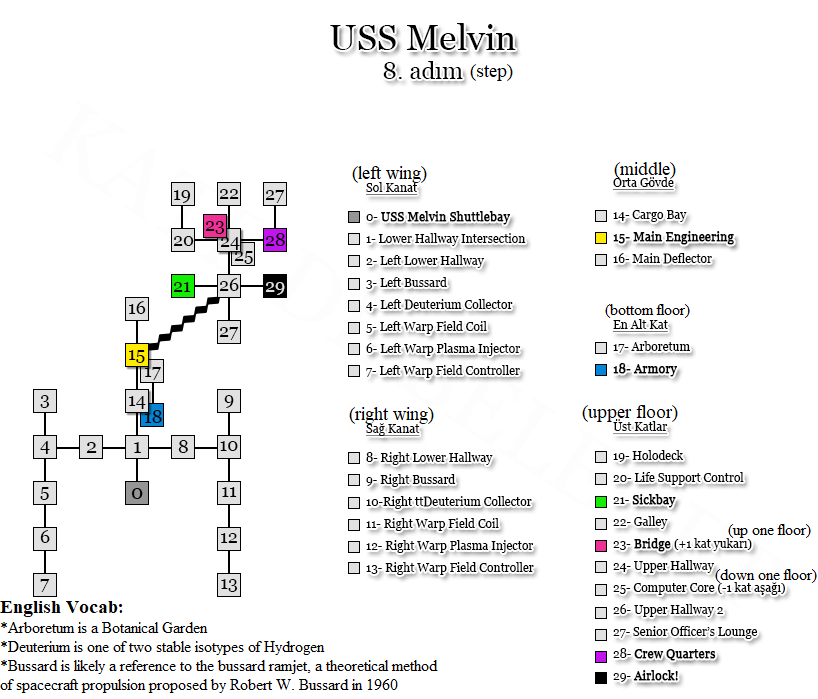
USS MELVIN
WARNING: You will be on the USS Melvin for 5.5 days before you receive your injection. Do NOT waste your injection as it only lasts an hour. Ensure that all members of your trio are ready to go to the Red Planet.
Note: Your crystal reader will need to go back and read the crystals again.
Note: Your crystal reader will need to go back and read the crystals again.
Essentially, all you do for the next 5.5 days is repair the ship as needed using Duct tape.
Duct tape is located at Main Engineering (YELLOW #15). However, only one person can get duct tape every 4 hours. If you have duct tape you can use it to repair the ship.
Flamethrowers are located at the Armory (BLUE #18). They help keep the face huggers away. Please note that Bilbot will take it away at some point during your stay.
Tihe gloves are located in the Sickbay (GREEN #21). However, only one person can get a pair every 24 hours. If you have the gloves you can use them to help Bilbot save people from the face huggers.
AFTER you receive the injection
Go to the Crew Quarters (PURPLE #28)
Use the shot when your trio is ready (this will take aprox 3 mins)
Red Planet
WARNING: Potential Unknown Map
Note: Your oxygen will be 100% upon arrival.
Go to the Face of Cydonia
N - NE - N - W - NE - E - NE - N
Use the Airlock (this will take aprox 8 mins)
Use the Emergency Oxygen Supplies
A 'we come in peace' pin should prevent spider attacks.
Ensure that their is an active crystal reading
Use Halls of Cydonia Airlock (will take aprox 8 mins)
Note: You can't use the airlock for an hour.
WARNING:
You will lose oxygen both in the pressure room and in Halls of Cydonia. Recharge it before leaving.
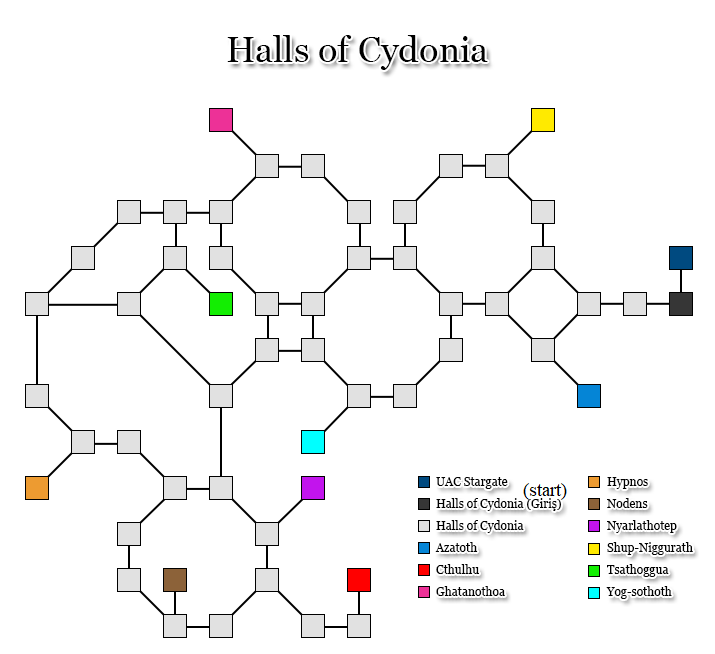
ONE Member needs to Go to the UAC Stargate
N
See the order of the Terminal Computers
Note: The runes need to be used in this order
Each member will go to ONE of the three runes
Use the runes in the order they were in at the terminal
NOTE: Do NOT leave the rune til everyone has used theirs
Once all three runes are used, go to the UAC Stargate. A portal should be there.
Use the portal (this will take aprox 1 hr)
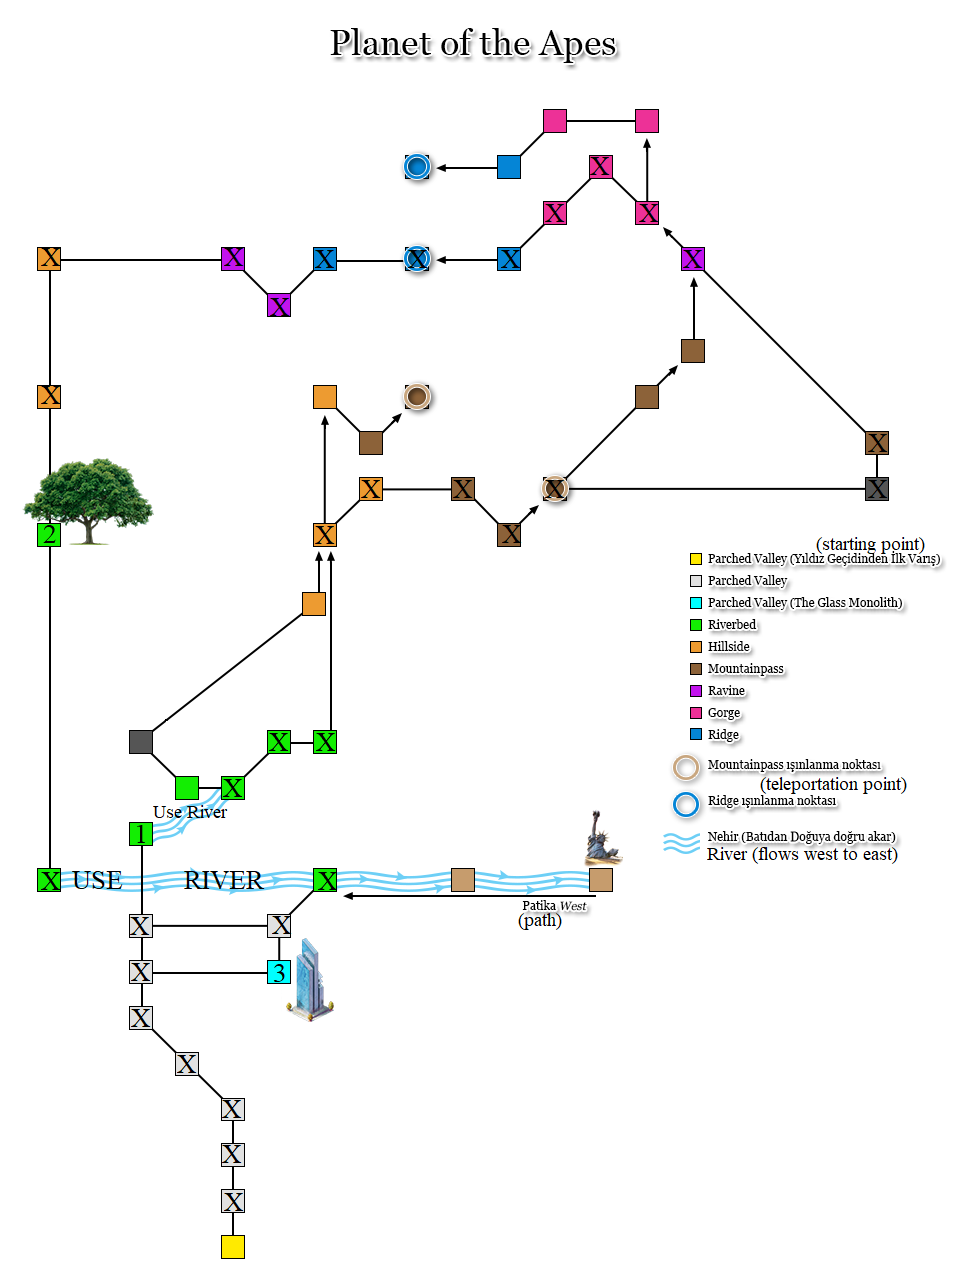
Planet of the Apes
Note: You can disband your team at this point
The X's mark your route.
The X's mark your route.
|
Directions:
Go to Riverbend (GREEN #1) N - N - NW - NW - N - N - N Use the River Go to Riverbend (GREEN #2) Riverbed Paths Use NE Path Use E Path Use N Path Hillside Paths Use NE Path Use E Path Mountain Pass Paths Use SE Path Use NE Path Use E Path |
Directions Cont.
Cliff Paths Use N Path Mountain Pass Paths Use NW Path Ravine Trails Use NW Trail Gorge Paths Use NW Path Use SW Path Use SW Path Ridge Trails Use W Trail Use W Trail Use SW Trail |
Directions Cont.
Ravine Trails/Paths Use NW Trail Use W Path Hillside Paths Use S Path Use S Path Use Majestic Tree (Receive a Branch) Go to Monolith (LIGHT BLUE #3) Use S Riverbed Path Use River SW - S Use Human Monkey Moon-Watcher Use Monolith (Glass) Trip to the Wonderful Room will take aprox 4 hrs |
The wonderful room
Use the Easter Egg
(will grant you the Hard Boiled Achievement)
Note: The mirror cycles through the stages of life.
Use these items at each stage:
Adult - door
Elderly - table
Dying - bed
Eventually a monolith will show up.
Use the monolith
(will grant you either 30 XP or Rejuvenation to an age 16+)
(will grant you Starchild Achievement)
